Introduction
A gel base coat is the foundation everything else depends on. If it doesn't cure properly, every layer on top — color, top coat, nail art — is sitting on an unstable surface. The result is peeling, lifting, and a manicure that fails within days.
The frustrating part? A sticky or gooey base coat after lamp exposure is one of the most misunderstood problems in gel nail application. Many people can't tell whether something has actually gone wrong or whether their product is behaving exactly as it should.
This guide clears up that confusion. You'll learn the difference between a normal inhibition layer and a genuinely uncured base coat, the most common causes of curing failure, and a step-by-step process to diagnose and fix the problem — for both home users and working nail technicians.
Key Takeaways
- A slightly tacky base coat after curing is normal — it's the inhibition layer, not a failure
- True under-curing shows as wrinkling, gooeyness, or easy denting — not just stickiness
- Lamp incompatibility (wrong wavelength) is the most common root cause professionals overlook
- Always follow manufacturer-specified lamp and cure time — universal wattage rules aren't reliable guidelines
- Cure times vary widely by brand — some base coats need as little as 10 seconds under LED
What Is a Gel Base Coat and Why Does Curing Matter?
A gel base coat is a light-curable polymer layer applied directly to the nail plate. Its job is twofold: create a bonding surface for color coats and protect the natural nail from staining and product contact.
Curing is a chemical reaction called photoinitiated polymerization. When UV or LED light hits the gel, photoinitiators in the formula absorb that light energy, generate free radicals, and trigger the monomers to cross-link into a solid, hardened network. Without that reaction, the gel stays soft and flexible — unable to anchor anything applied over it.
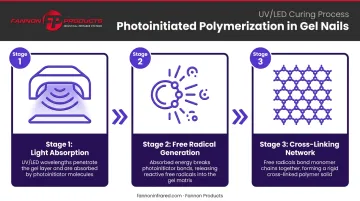
The base coat is uniquely critical because it interfaces directly with the nail plate. Gel nail products contain methacrylates, photoinitiators, pigments, and stabilizers — and polymerization only begins when those photoinitiators receive the correct wavelength of light. Any failure at this first layer cascades through the entire manicure.
There's also a safety dimension. The American Academy of Dermatology notes that skin sensitization can occur when uncured gel products make contact with skin — a serious risk if an improperly cured base coat is left in place rather than removed and corrected.
Signs Your Base Coat Is Not Curing Properly
Before diagnosing a problem, understand one critical distinction: not all tackiness means failure.
The Normal Inhibition Layer
NailKnowledge explains that every cured UV gel leaves a sticky surface film because oxygen at the surface inhibits the growing polymer chains from fully completing. This oxygen inhibition layer is intentional: it serves as the bonding surface for your next coat. A slightly tacky base coat after curing is correct and expected.
Signs of Genuine Under-Curing
These are the indicators that the base coat has not properly polymerized:
- Wrinkling or crinkling under the lamp during or after exposure
- Easy denting — the surface deforms when pressed gently with a fingernail
- Gooey, wet, or stringy texture rather than firm with slight tackiness
- Color slides or shifts when applied, or won't adhere evenly
- The base coat transfers onto a wipe even after full cure time
Over-Curing Is Also Possible
Under-curing gets most of the attention, but too much UV or LED exposure creates the opposite problem. An over-cured base coat becomes rigid and brittle, loses the inhibition layer needed for color coat adhesion, and can make the product resistant to acetone removal. Stick to the manufacturer's recommended cure time — running extra cycles on the same layer won't improve results and will likely cause problems.
Why Your Base Coat Is Not Curing: Root Causes
Most curing failures come down to four causes. Pinpointing the right one before attempting a fix matters — the wrong solution wastes time and can worsen the problem.
Lamp Incompatibility
This is the cause professionals most often overlook. Gel formulas contain photoinitiators that absorb specific wavelengths of light. ProNails explains that professional LED lamps typically emit at 365 nm and/or 405 nm, while UV lamps cover a broader 320–400 nm range. Using an LED-only formula under a UV lamp (or vice versa) can prevent the polymerization reaction from occurring entirely.
Key lamp checks:
- Verify compatibility with your specific gel brand before anything else
- Check lamp age and output: UV fluorescent bulbs degrade with use even when they still glow. CND's UV lamp documentation puts bulb lifespan at approximately 100 hours before output drops
- Keep hand placement consistent; fingers curled, stiff, or too far from the light source reduce effective exposure and cause uneven curing
Note on wattage: the research does not support a universal minimum wattage as a reliable standard. Manufacturer-validated lamp compatibility is far more meaningful than wattage alone.
Applying Too Thick a Layer
Thick base coat layers block light from penetrating to the full depth of the product. The surface cures while the layer beneath stays soft. A 2025 study on UV/LED gel formulations confirms that electromagnetic radiation penetration is limited through thicker layers, particularly in pigmented or high-viscosity systems.
Thick layers also increase the risk of a heat spike during curing. When the surface cures faster than the underlying product, wrinkling or bubbling follows. Apply base coat as a thin, flat film and wipe excess off the brush before touching the nail.
Contaminated or Expired Product
Gel base coat degrades when exposed to ambient light, air, or temperature extremes. Signs of compromised product include thickened consistency, separation, or an unusual smell. Pink Gellac states its gel polish is usable for 12 months after opening and 30 months unopened, though these figures are brand-specific and don't transfer universally.
Worth separating out: nail oils, residue from cuticle prep products, or moisture on the nail plate can prevent bonding and mimic a curing failure. That's a prep issue, not a product issue — the result looks identical either way.
Inadequate Nail Preparation
An improperly prepped nail has natural oils, dust, or moisture acting as a barrier between the nail plate and the base coat. The gel can't bond, and the gel won't cure regardless of lamp quality or product freshness.
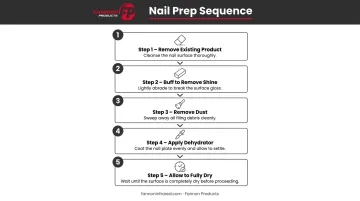
The correct prep sequence:
- Remove all existing product and clean the nail surface
- Lightly buff to remove shine and create adhesion texture
- Remove all dust with a clean brush
- Apply a nail dehydrator or prep solution to eliminate oils and moisture
- Allow the nail to fully dry before applying base coat
How to Fix a Base Coat That Won't Cure
Step 1: Test Whether It's a Lamp or Product Issue
Try curing the base coat with a different lamp — one you've confirmed is compatible with your gel brand. If it cures properly under a different lamp, the original lamp is the problem. If it still fails, the issue is product condition or application technique.
From there, check your lamp against the gel manufacturer's specifications. Look for visible signs of degradation: dimming, flickering, or uneven light distribution.
For UV lamps, check when bulbs were last replaced. For LED units, assess whether the lamp has reached the end of its rated lifespan. Unlike UV lamps, LED lamps require full unit replacement (not just bulb swaps) when output drops.
Step 2: Remove the Uncured Base Coat and Restart
Do not attempt to cure additional layers over a confirmed uncured base coat. Trapping uncured product increases the risk of skin sensitization from prolonged acrylate contact.
- Wipe away gooey or contaminated product with a lint-free wipe and acetone
- Avoid touching uncured gel with bare skin
- Re-prep the nail surface completely before reapplication
Step 3: Apply a Corrected Base Coat
Apply the thinnest layer that still provides full, even coverage. The gel should sit flat on the nail plate without flooding the cuticle or sidewalls.
Cure according to your specific brand's instructions (not a generic timer). Actual base coat cure times vary significantly: Gelish Foundation Base Gel lists 10 seconds LED / 30 seconds UV, while OPI Stay Classic Base Coat specifies 30 seconds in the OPI Dual Cure LED light. Always defer to the product manufacturer's stated times.
Keep the hand flat and relaxed inside the lamp, fingers separated, with all nails — including the thumb — receiving direct, unobstructed exposure.
Step 4: Validate the Cure Before Proceeding
After curing, press very gently on the center of one nail. A correctly cured base coat:
- Feels solid and resists denting
- Retains a slight tackiness (the normal inhibition layer)
If it dents or feels gooey, address the lamp issue before continuing. Do not wipe the inhibition layer between base coat and color coat — that tackiness is intentional and serves as the bonding surface for the next layer.
Preventive Measures to Keep Your Base Coat Curing Correctly
Once you've diagnosed the source of a curing problem, the next step is making sure it doesn't repeat. Three habits prevent the majority of base coat curing failures:
1. Use and maintain the right lamp
- Always use a lamp validated for your gel brand — not just any lamp with a high wattage number
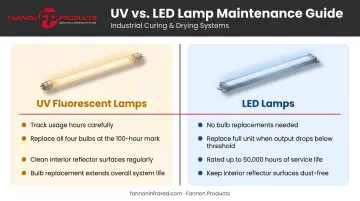
- For UV fluorescent lamps: track hours of use; CND recommends replacing all four bulbs together at the 100-hour mark
- For LED lamps: the units themselves need replacement when output drops, not just bulbs; Gelish's Pro LED Light is rated up to 50,000 hours with no bulb replacements
- Keep the lamp interior clean — residue and dust reduce effective output
2. Store gel products correctly
- Keep base coat tightly sealed, away from direct light and heat sources
- Discard any product that has thickened, separated, or smells unusual
- Never double-dip the brush into the bottle after nail contact — this introduces contamination
- Follow brand-specific shelf-life guidance rather than assuming all gels last the same duration
3. Maintain disciplined application technique
- Dehydrate the nail surface before every application — no exceptions
- Apply thin layers, cure each one completely before moving to the next
- Check hand placement inside the lamp on every use
Built into your routine, these three practices eliminate the most common curing failures before they start.
Frequently Asked Questions
How do I know when my base coat is cured?
Press gently on the nail surface after curing — a properly cured base coat will feel solid and resist denting while still retaining a slight surface tackiness. That tackiness is the normal inhibition layer. Visible wrinkling, gooeyness, or easy denting indicates genuine under-curing.
Should base coat be fully cured?
Yes — the base coat should be fully polymerized (hardened) beneath the surface. It will still have a tacky inhibition layer on top due to oxygen exposure, which is by design.
Why is my base coat still tacky after curing?
Slight tackiness is normal and expected — it's the normal oxygen inhibition layer. True under-curing looks different: gooey, dentable, or wrinkled. If your base coat is genuinely gooey after curing, the most common causes are the wrong lamp type, insufficient lamp output, or an overly thick application.
How long should I cure my base coat under an LED lamp?
Cure times vary significantly by brand — base coat examples in the research range from 10 seconds (Gelish, CND) to 30 seconds (OPI). Always follow the specific manufacturer's instructions. There is no reliable universal standard for base coat cure time.
Can I over-cure my gel base coat?
Yes. Excessive UV or LED exposure makes the base coat too hard and brittle, reduces the inhibition layer needed for color coat bonding, and can make product removal with acetone more difficult. Cure to the recommended time and avoid running additional cycles on the same layer.
Does the type of lamp affect base coat curing?
UV and LED lamps emit different wavelengths, and gel formulas are built around specific photoinitiators that absorb those wavelengths. Using the wrong lamp type can prevent curing entirely. Confirm whether your base coat is rated for UV, LED, or dual use before purchasing a lamp.