Infrared (IR) lamps solve this problem, and they're used across automotive, aerospace, and general industrial markets as a proven oven-free curing method. But results vary considerably. Products Finishing notes that IR curing can be up to 10x faster than convection in powder coating operations — when executed correctly. Getting it wrong produces finishes that look cured but chip, delaminate, or fail adhesion tests within weeks.
This guide covers the exact process, required equipment, the variables that control quality, and the mistakes that most commonly undermine results.
Key Takeaways
- IR lamps heat the metal directly — the part must reach the powder's specified cure temperature, not just the surrounding air
- Cure temperature varies by powder chemistry; always consult the technical data sheet (TDS) before starting
- The cure timer starts when the metal reaches target temperature — not when the lamp turns on
- Part mass, lamp wattage, and distance all affect how long reaching that temperature takes
- A non-contact infrared thermometer is non-negotiable for verifying cure without an oven
How to Cure Powder Coat Without an Oven
This process focuses on infrared lamp curing — the only oven-free method that can reliably achieve and sustain the temperatures required for a proper thermoset cure. Follow each step in sequence; skipping steps, particularly pre-baking, is one of the most common causes of failed finishes.
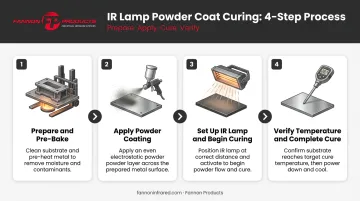
Step 1: Prepare and Pre-Bake the Part
Strip the part to bare metal and degrease thoroughly with acetone or denatured alcohol. Wear clean gloves from this point forward — skin oils deposited on the surface cause adhesion failures that are invisible before curing but obvious after.
Pre-bake the clean metal part using the IR lamp before applying any powder. This draws out trapped oils and volatiles from porous metals — TIGER Drylac identifies cast iron, steel, and aluminum as substrates prone to outgassing during powder coating. Continue pre-baking until the part stops smoking, then allow the metal to cool before proceeding.
Step 2: Apply the Powder Coating
Once the part has cooled to room temperature, apply the electrostatically charged powder using a grounded part and spray gun. Maintain approximately 8 inches (100–300mm) between the gun tip and the surface, working at 10–15 psi atomizing pressure.
Before proceeding to cure, inspect:
- Recesses and grooves for insufficient coverage, which will show through after curing
- Edges where powder tends to pull away, requiring extra passes
- Flat faces for thick buildup (causes orange-peel) or thin spots (causes color inconsistency)
Step 3: Set Up the Infrared Lamp and Begin Curing
Position the IR lamp at the manufacturer-recommended distance from the coated part. Per Ceramicx's documentation of the Inverse Square Law, infrared intensity per unit area varies inversely with the square of the distance — doubling the lamp distance significantly reduces heat delivery. Too close, and the powder scorches before it can flow out evenly.
For large parts, plan a section-by-section curing pass rather than trying to cure everything simultaneously with a single lamp. Move the lamp slowly and steadily, monitoring surface temperature as you go.
Fannon Products, a Michigan-based manufacturer with nearly 70 years in industrial infrared systems, offers configurations ranging from compact units for small components to high-output systems engineered for motorcycle frames and large fabricated assemblies.
For application-specific recommendations, contact their engineering team at 810-794-2000 or sales@fannonir.com.
Step 4: Verify Temperature and Complete the Cure
Use a non-contact infrared thermometer to check metal temperature at multiple points across the part. Start the cure timer only after all measured areas reach the powder's specified metal temperature — consult your powder's TDS for the exact figure.
Key rules for this step:
- Hold temperature for the full specified dwell window (commonly 10–20 minutes depending on the powder chemistry)
- Check multiple spots, not just the area closest to the lamp
- Allow natural cooling to room temperature before final inspection — do not force-cool with water or compressed air while the coating is still above the glass transition temperature (typically around 250°F)
What You Need Before Getting Started
Curing success depends heavily on preparation quality. Wrong equipment or missing verification tools undermine even perfect application technique.
Equipment and Tools Required
| Item | Purpose |
|---|---|
| Infrared heat lamp (appropriate wattage) | Primary heat source for curing |
| Non-contact infrared thermometer | Verifying metal temperature at multiple points |
| Powder coating spray gun with grounding cable | Electrostatic powder application |
| Air compressor (capable of 10–15 psi) | Atomizing air for powder delivery |
| Acetone or denatured alcohol | Degreasing before powder application |
| Clean nitrile gloves | Preventing surface contamination |
| Dust respirator (spraying) + charcoal respirator (curing) | Respiratory protection |
Powder and Surface Readiness
Check the powder's TDS before starting — different chemistries have distinct cure requirements:
- TGIC-polyester (Axalta example): 10 minutes at 400°F
- Polyester TGIC-free (AkzoNobel example): 15–30 minutes at 300°F, or 10–20 minutes at 350°F
Never assume one powder cures the same as another. Epoxy, polyester, and hybrid formulations all have distinct cure windows.
Once you've confirmed your powder's cure specs, run through these safety checks before picking up the spray gun.
Safety Checks
Three hazards require attention before starting:
- Fire risk: Keep the spray area clear of open flames and ignition sources — airborne powder is flammable.
- Inhalation exposure: Wear a dust respirator during spraying, then switch to a charcoal respirator near the curing lamp, which off-gasses fumes as the coating heats up.
- Electrical shock: Never touch the spray gun emitter during operation. Anyone with a pacemaker or implanted electrical device should not operate the spray gun.
Key Parameters That Affect Curing Results Without an Oven
Unlike an enclosed oven where heat is ambient, IR curing requires the operator to actively manage several interdependent variables. Failing to control any one of them typically produces an undercured or cosmetically flawed finish.
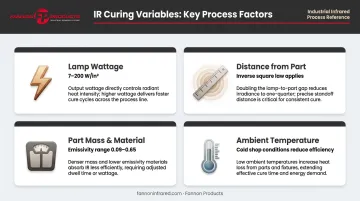
Lamp Wattage
Higher wattage delivers more radiant energy per unit time, shortening the time needed to reach metal temperature. An undersized lamp may never bring a thick or dense part up to cure temperature, regardless of how long it runs.
Thermal Products documents emitter watt-density capabilities ranging from 7 W/in² for ceramic generators up to 200 W/in² for T3 quartz lamps — the right choice depends on part mass, geometry, and required cure speed. Running multiple lower-wattage lamps in parallel is a practical solution for larger parts when a single high-output lamp isn't available.
Distance from the Part
The inverse square law means small changes in distance produce significant changes in heat delivery. Moving a lamp from 12 inches to 24 inches from the surface doesn't halve the intensity: it reduces it to roughly one-quarter. Work within your lamp manufacturer's recommended distance range and use a fixed-mount or measured standoff to hold that distance consistently.
Part Mass and Material
A heavy steel bracket and a thin sheet metal panel require very different dwell times to reach the same metal temperature. Dense parts absorb heat more slowly, and the surface may look fully cured while the underlying metal never reached target temperature. This is one of the most common causes of undercured powder in IR setups — verify with a contact or IR thermometer rather than judging by appearance.
Surface material compounds this further. Ceramicx documents significant variation in IR absorptivity: polished aluminum sits at 0.09 emissivity versus rusted iron at 0.65, meaning some surfaces absorb infrared energy far more efficiently than others. Factor this in when setting dwell times for unfamiliar substrates.
Ambient Temperature
IR lamps heat the part directly rather than the surrounding air, so the method works in cold shops. That said, low ambient temperatures do extend heat-up time, particularly for heavy or dense parts. Monitor metal temperature more frequently in cold conditions and don't start the cure clock until the part actually reaches target temperature.
Common Mistakes When Curing Powder Coat Without an Oven
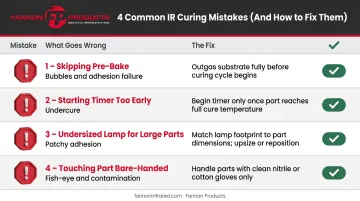
Skipping the pre-bake. Cast iron, steel castings, and aluminum all trap volatile contaminants inside the metal. A pre-bake drives those out before powder is applied — skip it and they vent straight through the coating as bubbles and adhesion failures.
Starting the timer too early. Cure time starts when the part reaches target temperature, not when the lamp ignites. Timing from lamp-on produces coatings that look fine but chip or delaminate under mechanical stress.
Using an undersized or single lamp for large parts. A single low-wattage lamp swept over a large part leaves different sections at different temperatures simultaneously. The result is patchy adhesion and finish inconsistencies that only show up once the part is in service.
Touching the part bare-handed after cleaning. Skin oils deposited between cleaning and powder application create contamination defects — fish-eyes, craters, and adhesion failures — that only appear after the cure cycle, when fixing them costs full rework.
When Should You Cure Powder Coat Without an Oven?
IR lamp curing fits specific situations well — and falls short in others. It's the right choice when:
- Parts are too large to fit in an available oven
- No dedicated powder coating oven is installed
- High-volume throughput is needed quickly, since IR can be significantly faster than convection
It becomes less practical or efficient in these situations:
- Complex geometries with deep recesses — IR is line-of-sight heat; shadowed areas receive significantly less energy, though conduction can carry some heat into hidden sections
- Very high-volume production — a properly sized convection oven offers more consistent, hands-off throughput at scale
- Strict coating uniformity standards — maintaining precise temperature uniformity manually across a large part requires more skill and more frequent verification
For shops handling a mix of part sizes, the most practical setup pairs a dedicated small oven for components that fit with an IR lamp system for anything oversized. That combination covers most job types without requiring an industrial-scale curing investment — and leaves room to scale either capability as volume grows.
Frequently Asked Questions
Can you really get a fully cured powder coat finish without an oven?
Yes — as long as the metal part itself reaches and holds the powder's specified temperature for the required dwell time. Full cure depends on whether the metal received the correct temperature for the correct duration — not on which heat source delivered it.
What temperature does powder coat need to reach to cure properly?
Most thermoset powder coatings require the metal part to reach between 300°F and 400°F depending on chemistry and product — always check the specific powder's TDS. This is the metal temperature, not the air temperature around the part.
How long does it take to cure powder coat with an infrared lamp?
The cure dwell window is typically 10–20 minutes at metal temperature, but the time needed to reach that temperature varies widely. Thin sheet metal may get there in a few minutes; heavy castings can take 30 minutes or more.
Can a heat gun be used instead of an infrared lamp to cure powder coat?
No. Heat guns cannot maintain consistent temperature across the part surface, typically cannot sustain the required cure temperatures, and do not penetrate the part's mass the way infrared radiation does. They are not a reliable substitute.
How do I know when my powder coat is fully cured without an oven thermometer?
Use a non-contact infrared thermometer to verify metal surface temperature at multiple points across the part. Start the dwell timer only after all measured areas have reached the powder's specified cure temperature — appearance alone is not a reliable indicator.
Does the curing method affect how durable the final powder coat finish is?
The heat source (oven vs. IR lamp) doesn't determine finish quality. What matters is whether the metal reached the correct temperature for the correct duration. An undercured coating from any heat source will be brittle and prone to chipping regardless of how well the powder was applied.