Most people's instinct is to grab a hair dryer or bury the device in rice. Both responses make things worse. Moisture doesn't just cause an immediate short circuit — it triggers corrosion and electrochemical damage that continues for days even after a device appears dry on the outside.
This guide covers what water actually does to electronics at a component level, the correct immediate response, a step-by-step moisture removal process, and how to decide when to repair versus replace.
Key Takeaways
- Disconnect power immediately — energizing wet circuits is what destroys components, so cut power before anything else
- Avoid hair dryers, ovens, and microwaves — only controlled, low-level heat is safe for drying electronics
- Rice is ineffective; silica gel desiccant packs are a better consumer alternative
- Saltwater, soda, and juice exposures require isopropyl alcohol cleaning of the board, not just drying
- Call a professional if you notice a burnt smell, visible corrosion, or the device still fails after drying
What Water Damage Does to Electronics
Water damage operates on two timelines, and understanding both changes how you respond.
Phase 1 is immediate. When electricity flows through wet circuits, current finds unintended paths across the board, causing short circuits that can destroy components in seconds. This is why powering off immediately matters more than anything else.
Phase 2 is slower and often more destructive. Moisture enables electrochemical migration — a process where dissolved ions move between conductors under electrical bias, forming conductive dendrites that bridge circuits and cause failures. Research on surface insulation resistance failures shows PCBs need surface insulation resistance of 10⁸ ohms or higher for reliable operation — moisture can drop that figure by several orders of magnitude. This phase can continue for days after a device appears externally dry.
Why the Liquid Type Matters
Not all moisture exposure is equal. The conductivity and chemistry of the liquid determines how aggressively it attacks the board:
| Liquid | Conductivity / pH | Risk Level |
|---|---|---|
| Deionized pure water | 0.055 µS/cm | Low |
| Tap water | Variable (dissolved minerals) | Moderate |
| Seawater | ~55,000 µS/cm | Very High |
| Coca-Cola | pH 2.37 | Very High |
| Lemon juice | pH 2.25 | Very High |
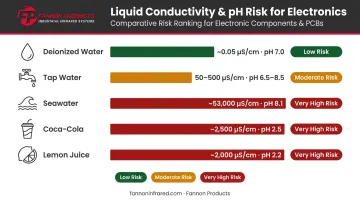
According to environmental measurement data, seawater conducts electricity at roughly a million times the rate of pure water. Cola and juice leave behind acidic residues even after drying — peer-reviewed beverage pH data confirms Coca-Cola Classic sits at pH 2.37, aggressive enough to corrode metal contacts over time.
Knowing what soaked the board shapes your response. Clean tap water gives you the longest recovery window. Saltwater, juice, or soda cuts that window sharply — and may require cleaning the board before drying to prevent residue from causing permanent damage.
First Response: What to Do in the First Few Minutes
Disconnect Power — Everything Else Comes Second
Pull the plug, power off the device, and remove the battery if accessible. Samsung's support guidance states this directly: internal mainboard damage and corrosion occur when a wet device remains powered. The water is not the enemy — electricity flowing through water-contaminated circuits is.
Do not press the power button to "check if it still works." Do not plug it in to charge. These actions combine voltage bias with moisture, exactly the condition that accelerates electrochemical migration and dendrite growth.
What to Avoid
- Hair dryers, heat guns, ovens, microwaves — excessive heat warps PCBs, melts solder joints (SAC305 lead-free solder liquefies around 221°C), and drives moisture vapor deeper into sealed assemblies
- Compressed air directly into ports — can push water further into cavities
- Vigorous shaking — displaces surface water but can force droplets deeper
Immediate Physical Steps
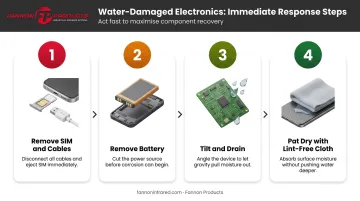
- Remove the SIM card, memory cards, and any external cables
- Open battery covers if accessible; remove the battery
- Gently tilt and drain — let gravity work, don't shake
- Pat dry with a lint-free cloth
The Rice Myth
Once the device is dry on the outside, the instinct to reach for a bag of rice is understandable — but it doesn't help. Apple explicitly advises against placing a wet iPhone in rice, warning that small particles can cause additional damage. iFixit is equally direct: rice does not remove corrosive contamination from inside electronic assemblies. It absorbs ambient surface humidity at best.
Silica gel desiccant packets in a sealed container are a better option. They absorb surface moisture faster than rice and won't introduce particles into ports or connectors. Neither will reach deep internal contamination, but silica gel at least does what you're actually trying to accomplish.
Check the Liquid Contact Indicators
Most smartphones have small LCI stickers inside the SIM tray or battery compartment. Apple's LCIs are normally white/silver and turn fully red on water contact; Samsung's shift from white to pink, purple, or red. Noting whether these have triggered helps assess severity and is relevant for any warranty or professional repair assessment.
How to Remove Moisture from Water-Damaged Electronics: Step-by-Step
Passive drying — leaving a device on a shelf and hoping — is where most DIY recoveries fail. A structured process is the difference between a recovered device and a permanently damaged one.
Step 1: Disassemble to Expose Internal Components
Remove covers, casings, and panels to expose the circuit board. Photograph everything before disassembly — this is not optional if you want to get it back together correctly.
Full disassembly is non-negotiable for any device that contacted acidic, sugary, or salty liquids. Surface drying on a closed device leaves contamination actively corroding the internals.
Step 2: Remove Visible Moisture Mechanically
- Dab (don't wipe) visible water with a lint-free microfiber cloth
- Use dry cotton swabs for connectors and ribbon cable ends
- Low-pressure compressed air can displace droplets from tight spaces
- A wet/dry vacuum held near openings (not pressed against them) can extract moisture from cavities
Step 3: Dry in a Controlled Environment
Place components in a warm, well-ventilated area. Avoid direct sunlight and open flames. The goal is controlled, low-level heat that accelerates evaporation without causing thermal damage.
Consumer drying methods rely on ambient conditions. Industrial environments demand more. Infrared drying systems — like those manufactured by Fannon Products for electronics manufacturing applications including water dry-off and PCB reflow — apply controlled radiant heat directly to the target surface with 96% radiant efficiency.
Unlike passive air drying, which relies on surface evaporation, IR radiation transfers energy directly into moisture-bearing material and can be adjusted from 0–100% output with instant on/off response. Production environments use this approach because it protects sensitive components while achieving rapid, thorough results.
For consumer DIY, the accessible alternatives are:
- Silica gel packs in a sealed container for moisture absorption
- Fan airflow in a warm room (not near a heat source)
- Minimum 24–48 hours before proceeding to the next step
Step 4: Clean Circuit Boards for Residue and Corrosion
Once the device is dry, use 90%+ isopropyl alcohol (IPA) and a soft brush — an old toothbrush works well — to scrub the circuit board. Focus on connectors, ribbon cable ends, and solder joints.
IPA dissolves mineral deposits and residue left by non-pure water, then evaporates cleanly without leaving moisture behind. This step is mandatory for anything other than pure distilled water exposure. Simply drying a board that was hit by juice, coffee, or saltwater leaves corrosive residue actively degrading contacts.
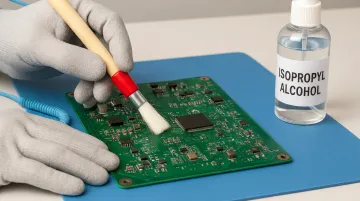
Ultrasonic cleaners, if available, can reach under IC chips and components that a brush cannot access. iFixit specifically recommends ultrasonic cleaning for inaccessible corrosion on logic boards.
Step 5: Final Inspection Before Reassembly
Check all connectors and cable ends for green or white discoloration — these are signs of oxidation that may need additional cleaning or professional attention. Allow the board to fully air dry after IPA cleaning before closing up the device. IPA evaporates quickly, but residual solvent should be completely gone before power is restored.
Step 6: Test Incrementally
Reassemble the device and restore power in stages:
- Power on and immediately check for heat, smoke, or unusual odor
- If none, test basic functionality before returning to full operation
- For industrial equipment, use a megohmmeter to verify insulation resistance has returned to acceptable levels (Megger's guidance cites approximately 1 MΩ per 1,000V operating voltage as a benchmark for industrial electrical equipment) before re-energizing under load
Fix vs. Replace: How to Tell If Your Electronics Are Salvageable
Recovery odds hinge on three variables: liquid type, exposure duration, and whether power was flowing during or after the event.
Fix If:
- The device was powered off during exposure
- The liquid was clean tap water
- You dried and cleaned it within 1–2 hours
- No burnt smell, no visible multi-component corrosion
Replace (or Seek Professional Assessment) If:
- The device was powered on during or after exposure
- The liquid was saltwater, sewage, juice, or cola
- The device was wet for more than 24–48 hours
- You smell burning, see corrosion across multiple components, or the device failed after a full drying attempt
For industrial equipment, the Replace threshold is stricter. NEMA GD 1-2016 specifies that many categories — including molded-case circuit breakers, adjustable-speed drives, and semiconductor-containing components — require replacement after water exposure, not reconditioning. On safety-critical equipment, consult the manufacturer before attempting any recovery; they can confirm whether recertification is even an option.
High-value devices — laptops, industrial control systems, professional cameras, gaming consoles — warrant professional evaluation even if DIY recovery is tempting. Professional restoration services have access to tools that go beyond anything feasible at home:
- Vacuum drying chambers to pull moisture from sealed enclosures
- Ultrasonic cleaning baths for thorough flux and contamination removal
- Component-level repair and rework on individual ICs or connectors
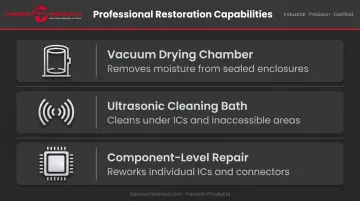
A professional assessment can also determine whether data recovery is possible even when the hardware itself cannot be saved.
Common Mistakes That Make Water Damage Worse
Most water damage that becomes permanent was made worse by one of these three mistakes:
- Powering on too soon — Moisture deep in circuit assemblies lingers long after surfaces look dry. Energizing a wet board triggers electrochemical damage that happens fast and is often irreversible. Don't power on until you're certain the board is fully dry.
- Using the wrong heat source — Hair dryers on high, ovens, and direct sunlight warp PCBs, deform housings, and push moisture vapor into sealed areas. If heat is part of your drying process, keep it gentle, indirect, and well-ventilated.
- Skipping board cleaning after contaminated water exposure — This is the step most guides leave out. Drying a board that contacted cola, juice, or saltwater only removes the water. Dissolved sugars, minerals, and acids stay behind, continuing to corrode contacts and degrade insulation resistance. IPA cleaning isn't optional after these exposures.
Preventive Measures
Prevention costs a fraction of recovery:
- Waterproof or water-resistant cases for portable devices in high-risk environments (check IP ratings — IP67 covers temporary immersion; IP68 covers continuous immersion under manufacturer-specified conditions per IEC 60529)
- Conformal coating for circuit boards deployed in industrial or high-humidity environments — IPC-CC-830 and UL746E set the standards for qualifying coating materials
- Dehumidifiers in environments where condensation is a recurring issue
- Keep liquids away from workstations — the simplest mitigation
- Regular data backups — water damage can destroy hardware beyond recovery; cloud or off-site backups ensure your data does
- Component documentation — keeping part specs on file accelerates replacement decisions when restoration isn't an option
Frequently Asked Questions
Can wet electronics be saved?
Many can, if power is disconnected immediately and the device is properly dried and cleaned before being turned on again. Clean water exposure with fast response gives the best odds; saltwater, sugary liquids, and extended exposure reduce them considerably.
How long does it take for water damage to permanently affect electronics?
Corrosion and electrochemical migration can begin within hours of exposure, particularly when ionic contamination is present. Devices left wet for more than 24–48 hours — especially those exposed to acidic or contaminated liquids — face significantly reduced recovery odds.
Does putting electronics in rice actually work?
No — and Apple specifically warns against it, as rice particles can enter and damage ports. More critically, rice cannot remove corrosive contamination from inside circuit assemblies. Silica gel desiccant packets in a sealed container are the safer, more effective alternative.
Can you use a hair dryer to dry out electronics?
Avoid hot settings — they can warp components and push moisture deeper into sealed spaces. If any heat source is used, only a cool or low setting applied briefly is acceptable. Controlled ambient drying with silica gel or gentle airflow is the safer approach.
How do you know if water damage to electronics is permanent?
Key indicators include a burnt smell, visible corrosion across multiple components, or complete failure to respond after thorough drying. On industrial equipment, extremely low insulation resistance readings from a megohmmeter confirm the diagnosis.
What is the best way to dry a water-damaged circuit board?
Blot visible moisture with a lint-free cloth and low-pressure compressed air, then place the board in a sealed container with silica gel for 24–48 hours. Follow with a 90%+ isopropyl alcohol clean using a soft brush before reassembling and testing incrementally.