Infrared heat lamps solve all three problems. They cure powder coating by heating the coated surface directly — not the air around it — which makes them faster, more flexible, and far more accessible for anyone working outside a commercial production facility.
This guide covers everything you need to know: how IR lamps work at the physics level, how they compare to conventional ovens, which lamp types suit different setups, and how to actually run a cure cycle safely from start to finish.
Key Takeaways
- IR lamps heat the coated surface directly via electromagnetic radiation, bypassing ambient air entirely — unlike a conventional oven that warms the surrounding space first
- Target surface temperature for most powder coatings: 325–400°F (163–205°C), monitored with an IR thermometer
- Research shows catalytic IR curing can reduce cure time by 80–90% compared to standard hot-air oven parameters
- For large or complex parts, work in sections; move the lamp methodically and verify temperature at each position
- Never leave the lamp unattended, keep it 25+ feet from flammable materials, and allow at least 10 minutes to cool before touching elements
How Infrared Heat Lamps Work for Powder Coating
The Physics: Direct Surface Heating
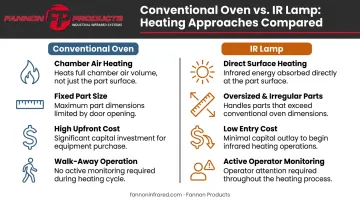
When you turn on an IR lamp, it emits electromagnetic radiation that travels through the air and is absorbed directly by the coated surface — converting to heat at the molecular level. This bypasses the surrounding air entirely, unlike a convection oven that has to heat the entire chamber before the part temperature rises.
The practical result: the part reaches cure temperature much faster, and the energy goes where it's needed rather than into warming empty chamber volume.
Wavelength and Why It Matters
Infrared radiation spans a wide spectrum, typically divided into three bands:
| Band | Wavelength Range | Relevance to Powder Coating |
|---|---|---|
| Near-IR (NIR) | ~0.75–2 μm | Limited absorption by most powder chemistries |
| Mid-IR (MIR) | ~2–4 μm | Strong match for powder functional group absorption |
| Far-IR (FIR) | ~4+ μm | Covers primary absorption peaks (5–10 μm range) |
Research published in Applied Sciences (Yuan et al., 2023) found that polyester/TGIC powder coating functional groups absorb most strongly between 5 and 10 μm — well into the mid- and far-IR range. That absorption profile is what drives mid-wave IR lamp selection for powder curing over short-wave alternatives.
The Cure Sequence
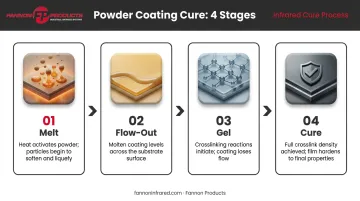
Once the coated surface reaches target temperature, powder coating moves through four distinct stages:
- Melt — powder particles soften and begin to flow
- Flow-out — the coating levels into a smooth film
- Gel — crosslinking begins as reactive groups activate
- Cure — the film hardens into its final chemical structure
IR radiation accelerates this sequence by bringing the surface to temperature rapidly. The same 2023 study found catalytic IR reduced cure time by 80–90% compared to standard hot-air oven parameters while still meeting adhesion, hardness, and impact resistance requirements.
IR heats from the outside in. Unlike an oven with a stable internal air temperature, an IR lamp can overshoot if distance and dwell time aren't managed carefully — so a dedicated IR thermometer functions as your primary process control instrument, not an afterthought.
Infrared Heat Lamps vs. Conventional Powder Coating Ovens
Cost and Size
A small batch powder coating oven — say, 5×5×5 ft — runs around $2,900 to $5,800 from suppliers like Light Armor. Larger walk-in ovens capable of handling full frames or long structural components require custom quotes and typically cost considerably more to purchase, wire, and install.
A capable portable IR lamp setup costs a fraction of that entry price, with no dedicated electrical installation required for smaller units.
The size difference is equally practical. Ovens limit you to whatever fits through the door. IR lamps can cure a motorcycle frame, a truck bumper, or a 10-foot driveshaft by moving the lamp across the surface in sections — flexibility no oven can match.
Energy Efficiency
IR lamps deliver energy directly to the part, not to the surrounding air volume. The Yuan et al. study found catalytic IR powder curing reduces energy consumption by approximately 30% compared to traditional hot-air ovens. In an industrial case study documented by the DOE, a manufacturer that switched to an IR curing system saw annual energy savings of roughly $54,000 with a 2.5-year payback period.
For a small shop running occasional batches, the per-cycle savings may be modest — but the elimination of keeping a large oven at operating temperature for hours adds up.
Where Ovens Still Win
IR lamps require active operator involvement: monitoring temperature, repositioning the lamp, managing dwell time at each location. A conventional oven lets you load the part, set a timer, and walk away.
Each tool has a clear home:
- Conveyor or batch oven: high-volume runs with identical parts cycling through the same process
- IR lamps: large single parts, repair work, low-volume custom jobs, and anything that won't fit through an oven door
Types of Infrared Lamps for Powder Coating
Lamp Form Factors
Three configurations cover most powder coating use cases:
- Portable single-lamp units on adjustable stands — the standard choice for small shops and garage setups. Lightweight, repositionable, and practical for working around irregular geometry
- Multi-lamp panel systems — provide more even coverage over a larger surface area, useful for flat panels or consistent batch work
- Custom-engineered IR fixture systems — designed for specific production line geometries, often with integrated controls and automated movement
Wattage and Its Effects
Wattage determines how much radiant power the lamp delivers. Higher wattage reduces the time needed to bring the part up to cure temperature, but it also narrows the margin for error. Too much power at too close a distance will scorch the coating before the substrate fully absorbs the heat.
Portable powder curing units commonly range from 1,800W to 6,000W. The Infratech HH-1800 is a widely used 1,800W hand-held portable unit; the HO-6000-P steps up to 6,000W for larger parts. Match wattage to your typical part size and substrate thickness — more isn't always better.
Lamp Types and Wavelengths
Once wattage is dialed in, wavelength is the next variable. Mid-wave lamps are the most common choice for powder coating because their output overlaps with the absorption peaks of polyester and epoxy-polyester chemistries:
- Short-wave quartz lamps — instant response, high power density, suited for applications needing rapid heat-up; require careful distance management on powder-coated surfaces
- Medium-wave quartz lamps — better spectral match for most powder formulations, longer element life, more forgiving operating parameters
- Twin-tube quartz lamps — available in both short- and medium-wave configurations; compact form factor with good directional efficiency, especially when paired with gold reflectors
Fannon Products manufactures all three lamp types from 250W to 6,000W+ across multiple voltages, with custom configurations available for both single-station shop setups and multi-zone production lines.
How to Use an Infrared Heat Lamp for Powder Coating: Step-by-Step
Preparing the Part and Workspace
Before powder goes anywhere near an IR lamp:
- Clean thoroughly — degrease all surfaces and remove rust, oil, and contaminants. Powder won't bond to a dirty substrate and IR won't fix adhesion failures caused by poor prep
- Remove heat-sensitive components — gaskets, plastic clips, rubber seals, and pre-existing paint near the curing area need to come off or be shielded; IR generates high surface temperatures
- Hang or support correctly — suspend parts from wire hooks for 360-degree access. For heavy parts, use bricks or blocks wrapped in aluminum foil to prevent powder baking onto the support surface. Wrap any fixture hardware that will be near the lamp in foil as well
Operating the Lamp
Follow this sequence every time:
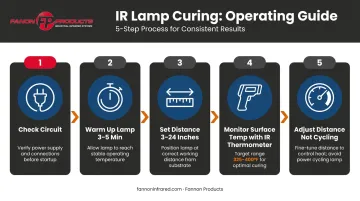
- Plug into an appropriately rated circuit — check the lamp's amp draw and confirm the outlet and wiring can handle it
- Warm up for 3–5 minutes before bringing the lamp near the part; elements need to reach operating temperature first
- Set initial distance per manufacturer spec — typically 3–6 inches for compact 1,800W units, 12–24 inches for higher-wattage systems
- Monitor surface temperature continuously with an IR thermometer — take readings at the heated area, not on the lamp housing. Target the powder manufacturer's recommended surface temperature (typically 325–400°F / 163–205°C)
- Adjust distance, not cycling — if the surface is heating too fast, increase standoff distance. If too slow, reduce it. Switching the lamp on and off creates uneven heating
Curing Large or Complex Parts
Some parts are too large to illuminate completely in one position — a full frame or structural crossmember, for example. Work in sections:
- Move from one end to the other, or bottom to top
- Hold each position until the surface reaches cure temperature for the required dwell time before advancing
- Check thin-gauge areas with the thermometer; thin metal conducts heat quickly and may reach cure temp ahead of the zone directly under the lamp
- Adjust your movement pace accordingly to avoid over-curing one area while another stays under-cured
Temperature Control and Cure Settings
Most polyester and epoxy-polyester powder coatings cure between 325–400°F (163–205°C) at the substrate surface. IFS Coatings' published cure schedules list standard polyester TGIC and hybrid systems at 400°F for 10 minutes, while low-cure formulations drop to 340°F for the same dwell time.
With IR, the target is always surface temperature — not ambient air temperature. This distinction matters because the lamp heats the part directly; the air around it may be 200°F while the coating surface reaches full cure temperature.
Substrate Thickness
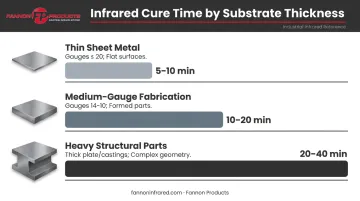
Thicker metal absorbs and retains more heat, which slows the rate at which the coating surface reaches target temperature from the outside in:
- Thin sheet metal — typically reaches target temperature in 5–10 minutes under an IR lamp
- Medium-gauge fabrication — allow 10–20 minutes depending on wattage and distance
- Heavy structural parts — may require 20–40 minutes of dwell time just to reach consistent PMT across the surface
The Yuan et al. study found a 1mm substrate cured most rapidly at 230°C, reaching temperature in about 3 minutes; substrates 2mm and thicker performed better at 220°C with longer dwell times.
Avoiding Over-Cure
Exceeding the cure temperature window causes real damage. Over-cured coatings show:
- Gloss reduction and surface dulling
- Yellowing (particularly in white and light colors)
- Color darkening and L* brightness drop
- In severe cases, cracking or coating delamination at high power density
If you're seeing any of these signs, increase lamp distance, reduce dwell time, and recheck your surface temperature readings before the next run.
Safety Tips for Using Infrared Heat Lamps
IR lamps generate intense radiant heat that can ignite materials, cause burns, and crack elements if handled incorrectly — follow these precautions every time.
Fire and Explosion Risk
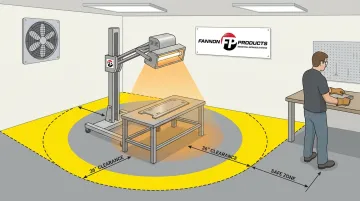
- Never operate within 25 feet of flammable materials or vapors — IR can heat objects at that distance
- Do not apply powder coating within 10 feet of an active lamp — airborne powder near a high-heat source is an explosion hazard
- Work in a well-ventilated space; cure fumes must be exhausted, not allowed to accumulate
- OSHA 29 CFR 1910.107 requires exhaust ventilation sufficient to keep the atmosphere below the lowest explosive limit when working with powder coatings
Eye and Skin Protection
- Never look directly at operating lamp elements — short-wave units in particular produce intense glare
- Use heavy leather or welding gloves when working near the lamp or taking close temperature readings
- Never touch elements during operation or before they have fully cooled
Cool-Down Protocol
Post-cure handling is where many element failures happen. Once the job is done, treat the lamp with the same caution you used during operation.
- After curing, turn the lamp off and wait a minimum of 10 minutes before touching the elements or moving the unit
- Quartz tube elements stay extremely hot after shutoff; handling them before they've cooled causes thermal shock fractures
- Never leave the lamp unattended while in operation
Frequently Asked Questions
At what temperature do you cure powder coat?
Most powder coatings cure at a surface temperature of 325–400°F (163–205°C). With IR lamps, that target is always the part's surface temperature — not ambient air — so monitor with an IR thermometer pointed at the coating, not the surrounding environment.
What kind of heat can powder coating handle after curing?
Standard cured powder coatings withstand continuous service temperatures of 200–250°F and intermittent temperatures up to 350°F. High-temperature formulations handle 500–1,200°F depending on chemistry. Exceeding the baking temperature during cure causes gloss loss, color shift, or adhesion failure.
What is the difference between a heat lamp and an infrared lamp?
All IR lamps are heat lamps, but not all heat lamps are infrared. Standard incandescent heat lamps generate warmth primarily through convection and conduction. True IR lamps emit targeted electromagnetic radiation that heats surfaces directly through absorbed radiation, making them far more efficient for industrial curing.
Can I use an infrared heat lamp instead of an oven for powder coating?
Yes. An IR lamp can fully replace a curing oven, particularly for large or irregular parts that won't fit inside one. Monitor surface temperature carefully and move the lamp to ensure complete coverage.
How far should an infrared lamp be from the powder coated part?
Distance depends on wattage. Compact 1,800W units typically operate 3–6 inches from the surface. Higher-wattage units (3,000W–6,000W) generally require 12–24 inches of standoff to prevent scorching. Always verify with an IR thermometer regardless of the lamp's rated specs.
How long does it take to cure powder coating with an infrared lamp?
Small parts typically cure in 6–15 minutes of direct lamp exposure. Large or complex parts may take 2–6 hours total elapsed time as the operator works section by section, with exact timing depending on substrate thickness, lamp wattage, and the powder's specified parameters.