Introduction
Every hour a coated part sits waiting to cure is an hour your booth isn't producing revenue. According to BodyShop Business, an efficient shop targets 1.8 hours or less per booth cycle—but many shops run closer to 2.25 hours, losing an entire vehicle's worth of throughput each day. In fabrication and manufacturing environments, the math hits just as hard.
Slow curing also creates a quality trap that's easy to miss. Paint that feels dry to the touch hasn't finished curing, and treating it as job-complete risks surface marring, adhesion failures, and rework that costs more than the lost cycle time.
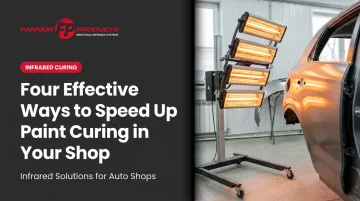
This article covers four methods professional shops use to actively accelerate curing (true cure, not just surface drying) without introducing new defect risks: controlled heat application, high-velocity airflow, paint consistency management, and substrate preheating.
Key Takeaways
- "Dry to the touch" and fully cured are not the same thing—complete cross-linking takes far longer and needs active management
- Heat accelerates cure by raising metal temperature; always follow the coating's TDS, not a generic booth setpoint
- Run high-velocity airflow only after painting is complete, not during application
- Over-thinning paint extends cure time and creates defect risk; control viscosity with equipment, not solvent
- Cold substrates are a hidden bottleneck—preheat to above dew point before the first coat lands
Why Paint Curing Matters More Than Just Drying
Drying and curing are two different states, and confusing them is where rework starts.
Drying is physical: solvents or water evaporate from the film surface. Curing is chemical: the coating's polymer chains cross-link to develop their final hardness, adhesion, and chemical resistance. In thermoset systems—epoxies, polyurethanes, automotive urethanes—this cross-linking process continues well after the surface feels dry, sometimes competing with film formation in ways that aren't visible until a defect appears.
Release a part too early and you'll see:
- Surface marring from handling or stacking
- Adhesion loss under mechanical stress or UV exposure
- Solvent pop from trapped volatiles that couldn't escape before the surface skinned over
- Wrinkling or lifting, especially in heavy-build coatings where film build traps the reducer underneath
Cure timelines vary significantly by coating type and conditions. Use the product's Technical Data Sheet (TDS) for through-dry, recoat, and service times — not generic rules of thumb. An industrial alkyd enamel may reach handle strength in 5–10 hours; a 2K epoxy system may need days at ambient temperature.
The four methods below address the variables that actually drive those timelines: heat, airflow, chemistry, and equipment — so you can move parts faster without sacrificing film integrity.
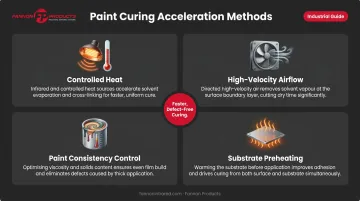
Way #1: Apply Controlled Heat to the Painted Surface
Why Heat Works—and What Temperature to Target
Heat accelerates the chemical reactions that drive curing. The key variable is metal temperature, not the booth air setpoint. PPG's refinish data sheets illustrate this clearly: one 2K HS clearcoat specifies a rapid process cycle at 60°C (140°F) metal temperature, while a UHS clearcoat using medium-wave IR targets 90–100°C (194–212°F) metal temperature. Those are product-specific targets, not universal benchmarks—always confirm with the coating manufacturer's TDS before setting cure schedules.
Two main approaches apply heat in shop environments:
- Raising ambient booth temperature — practical for enclosed booths doing full-vehicle or large-part finishing
- Targeted/localized heat — suited to spot repairs, open bays, or situations where heating the entire space is impractical or energy-wasteful
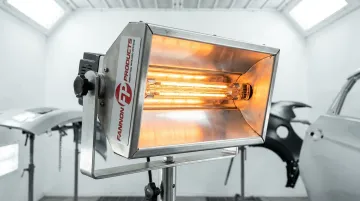
Why Infrared Is the Preferred Option for Targeted Curing
Automotive refinishing shops favor infrared heat because it doesn't rely on warming the surrounding air first. IR radiation penetrates the paint film and heats the substrate directly, producing faster and more even curing from the inside out. Products Finishing confirms that IR curing can shorten cure cycles and reduce floor-space requirements compared to conventional heated-air methods.
That's where purpose-built IR lamps make a measurable difference. Fannon Products manufactures short-wave and medium-wave quartz infrared lamps for automotive paint curing, covering primer, color coat, clear coat, and powder coat applications.
Key specs worth knowing:
- Short-wave lamps: 96% radiant efficiency with instant thermal response, 1,000W to 6,000W+, available in voltages from 115V to 600V
- Goldenrod lamps: integral 24K gold reflector focuses IR energy precisely on the target area, cutting energy cost by 23.5% versus standard lamps — no separate reflector housing needed
- Custom systems: engineered to specific bay dimensions and substrate requirements, with 0–100% output adjustment and safety interlock controls
Shops can also source direct replacement lamps for existing IR equipment, which means adding infrared capability to a current paint bay without a full rebuild.
Operational Considerations
- Verify metal temperature with a contact thermometer or IR pyrometer, not the booth thermostat
- Ensure lamp coverage is even across the coated surface to avoid hot spots
- Stay within the coating manufacturer's specified bake window—temperatures outside the range cause color shift, blistering, or adhesion failure
- For high-voltage EVs, check OEM paint booth temperature recommendations before applying any heat cure cycle
Way #2: Direct High-Velocity Airflow Over the Painted Surface
The Boundary Layer Problem
As a paint film dries, evaporating solvents or water vapor form a thin, stagnant layer just above the surface. This boundary layer acts as a barrier, slowing further evaporation. High-velocity air disrupts it—continuously removing saturated air and allowing fresh evaporation from the film beneath.
For waterborne basecoats, this is especially critical. Standard downdraft booths create laminar airflow that doesn't effectively dehydrate the wet film. PPG's Envirobase High Performance TDS specifies warm air movement during flash-off, with booth temperature at 40–45°C and roughly 50% humidity reduction, to achieve express-process dry times. Wall-mounted blowers or handheld directional equipment create the turbulent flow needed to pull moisture out efficiently.
Sequencing Is Non-Negotiable
High-velocity air goes on after application is complete—never during spraying. Directing fast-moving air onto wet paint mid-application causes:
- Surface texture defects and orange peel
- Contamination from floor debris and overspray
- Uneven film build across the panel
Also avoid using a spray gun as a makeshift blower on wet basecoat. Beyond contamination risk, it introduces solvent-laden air at the wrong stage of the drying cycle.
Humidity Is the Other Half of the Equation
High-velocity airflow works best when shop humidity is controlled. Humid air has limited capacity to absorb additional solvent vapor, which reduces the effectiveness of even well-directed airflow. In regions or seasons with high ambient moisture, pairing directional blowers with dehumidification equipment in the painting bay delivers measurably faster results.
When setting humidity limits, keep these guidelines in mind:
- Most coating TDS documents cap maximum application humidity around 80–85%
- Always apply the stricter of the product spec and the job specification
- Don't rely on a blanket rule—specs vary by product and coating type
Way #3: Control Paint Consistency—Avoid Over-Thinning
Why Thinning Backfires on Cure Time
Adding solvent to improve atomization seems like a quick fix for thick coatings, but it creates compounding problems:
- Increases total solvent load in the wet film
- Extends flash and dry time beyond TDS specs
- Creates solvent entrapment risk if the surface skins before deeper solvents escape
- Raises the risk of wrinkling, lifting, and solvent pop—defects that PPG's refinish troubleshooting documentation directly ties to excessive film build and improper reducer selection

Better Viscosity Control Options
For professional shops running 2K epoxies, urethanes, and high-build industrial coatings, equipment solves the viscosity problem without introducing extra solvent:
- Plural-component sprayers: Graco's XP-series handles high-viscosity protective coatings at correct mix ratios—no thinning beyond TDS limits required
- In-line fluid heaters: Heating resin and hardener before mixing lowers viscosity and improves spray pattern without adding solvent (per Graco's application documentation)
Thin Coat Discipline
Multiple thinner passes outperform one or two thick build coats—for curing speed and final film quality. Thinner individual coats:
- Keep each layer's solvent load manageable
- Allow proper flash between coats
- Reduce the risk of solvent entrapment in the overall build
- Produce more predictable cure cycles across the full coating system
If a coating still feels too viscous to spray cleanly, check temperature, mix ratio, tip size, and pump pressure first—before reaching for the thinner can.
Way #4: Preheat the Substrate Before Applying the Coating
Cold Metal Is a Hidden Bottleneck
A shop can have a heated booth and well-mixed coatings and still see slow, inconsistent curing when the substrate itself is cold. Steel and heavy metal components hold ambient temperature long after they're moved inside. A cold substrate slows solvent evaporation and, in thermoset systems, slows the chemical reactions driving cure.
Many coating specifications set minimum surface temperatures that must be met before application. Tnemec's reinforced vinyl ester application guide specifies a 60°F minimum surface temperature and states the coating will not cure below that threshold. The "50°F minimum" commonly cited in shops is not a universal standard—always confirm the actual product TDS.
The Dew Point Risk
Cold substrates carry a second risk: condensation. When a cold part moves into warmer, more humid shop air, moisture can condense on the freshly blasted surface before the first coat is applied. Sherwin-Williams' dew point guidance is clear: no coatings should be applied unless the surface temperature is at least 5°F above the dew point. Condensation on blasted steel introduces moisture contamination that impairs adhesion and curing regardless of how well you manage everything else.
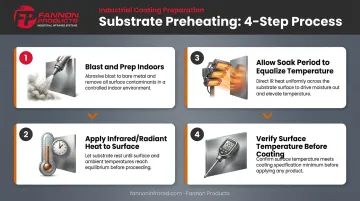
Practical Preheating Strategies
Both risks are controllable. These strategies address substrate temperature before the first coat goes on:
- Blast and prep parts indoors whenever possible, allowing substrate temperature to match the shop temperature
- If outdoor blasting is necessary, bring parts inside for a defined soak period before painting—don't assume the surface has warmed just because the shop is heated
- Use radiant or infrared heaters to bring substrate surface temperatures into the coating's application window—Fannon Products' custom IR systems can be configured for pre-coat substrate warming, in addition to post-application curing
- Monitor substrate temperature with a contact thermometer before every coat, particularly in cold-weather months or unheated bays
Shops that build substrate preheating into standard workflow, rather than treating it as a reactive fix, see more consistent cure cycles, fewer adhesion failures, and more predictable job scheduling.
Frequently Asked Questions
How long does paint take to dry and fully cure?
Surface dry times range from minutes to several hours depending on coating type, film build, temperature, and humidity. Full cure—where hardness, adhesion, and chemical resistance are reached—is product-specific; check the through-dry and service times in your coating's TDS. Heat and directed airflow can compress both timelines in controlled shop conditions.
Why is my paint still tacky after 2 days?
Persistent tack usually points to conditions outside the coating's cure window—excessive film build, trapped solvent, high humidity, a cold substrate, or the wrong reducer for your shop temperature. Check the product TDS for minimum application temperature and verify film build against the specified mil range.
What temperature should a paint booth be set to for curing?
The controlling variable is metal temperature, not booth air temperature. PPG refinish examples range from 60°C (140°F) for force-dry schedules to 90–100°C (194–212°F) for medium-wave IR processes—both measured at the substrate surface. Use the coating manufacturer's TDS bake schedule and verify metal temperature directly, not the booth thermostat readout.
Does infrared heat help cure automotive paint faster?
Yes. IR heats the substrate and paint film directly rather than warming ambient air first, producing faster and more even curing. Industrial IR lamps purpose-built for automotive applications—such as those manufactured by Fannon Products—offer controlled, precise heat delivery suited to both enclosed paint booths and open-bay spot repair setups.
Can high humidity in a shop prevent paint from curing properly?
Yes. High humidity slows solvent evaporation and can trap moisture in the film, extending cure time and causing adhesion failures. Most coatings cap application humidity at 80–85%—confirm against your product TDS, and pair directed airflow with dehumidification to address both problems at once.