This guide covers the full build: parts, safety, step-by-step construction, testing, and the problems most builders run into. If you follow the sequence and don't skip the validation steps, you'll have a working dryer — and a clear understanding of what it can and can't do.
Key Takeaways
- Budget $100–$150 in materials for a four-bulb 250W infrared build — and plan your electrical setup before touching any hardware
- Use ceramic or porcelain sockets only — plastic melts under sustained infrared heat
- Plastisol ink must hit 320°F at the ink surface for full cure; a laser temperature gun is the only way to confirm this
- Map your heat "sweet spot" before the first production run — temperature is never perfectly even across a DIY unit
- Best for hobbyist and low-volume printing — not a substitute for a commercial unit under production pressure
Building a DIY Flash Dryer for Screen Printing
The build follows a defined sequence: plan dimensions, source materials, construct the housing, install electrical components, then test before any garment touches it. Reversing steps — especially wiring before the box is fully assembled — makes installation harder and increases the risk of damaging components.
Expect a few hours if you're comfortable with basic tools. The two most common failure points are rushing the wiring and skipping the post-build temperature validation. Neither step should be shortcut.
Prerequisites and Safety Considerations
Before cutting a single piece of wood, sort out your workspace and electrical situation:
Workspace requirements:
- Clean, dry workstation with good ventilation
- No flammable materials within the work area — paper, fabric scraps, solvents
- The finished dryer generates significant heat; keep a Class C fire extinguisher accessible (carbon dioxide extinguishers are rated for electrical fires, per NFPA)
Electrical non-negotiables:
- Four 250W bulbs draw approximately 1,000W total at 120V — that's roughly 8.3 amps
- On a standard 15A circuit, the NEC recommends keeping continuous loads below 80% of rated capacity (12A), so a four-bulb array fits — but only if it's the primary load on that circuit
- Use ceramic or porcelain lamp sockets rated for at least 660W; UL 496 specifies that lampholder materials must not soften at sustained heat
- Do not use plastic sockets — they will fail and potentially catch fire under prolonged infrared heat exposure
- Do not run the unit off extension cord adapters as a permanent power connection
When to stop and get help: If you're unfamiliar with socket wiring, parallel circuits, or your shop requires a dedicated higher-amperage circuit, consult a licensed electrician before powering anything on.
Parts and Materials Checklist
| Item | Specification | Notes |
|---|---|---|
| Flat wood panels | 5 pieces, min. 12"×12" each | Untreated; scale up for larger print areas |
| Infrared heat bulbs | 4 × 250W, E26 base, 120V | R40 or BR40 format; quality matters here |
| Lamp sockets | 4 × ceramic or porcelain, E26 | Rated 660W/250V minimum |
| Power cord | 14 or 12 AWG, with plug | Rated for the combined wattage |
| On/off switch | Standard inline switch | Mounted on exterior panel |
| Leg pieces | 4 × 2x4 lumber, ~24" long | Adjust height to your platen setup |
| Fasteners | Nails or screws | For housing and legs |
| Drill | Standard | For cord entry and pilot holes |
| Laser temperature gun | — | Essential — not optional |
On bulb selection: The infrared bulb is the single most important component — it determines heat output, consistency, and how evenly the ink cures. A 4-pack of 250W R40/BR40 infrared bulbs runs roughly $19–$27 per bulb, so four bulbs alone cost $77–$108 before any other materials.
Don't substitute lower-wattage bulbs expecting similar results — the heat output won't be sufficient at practical working heights. If you need guidance on lamp specifications for your build configuration, Fannon Products stocks replacement infrared lamps in every wattage and voltage for ink-drying applications, including lamps used in M&R commercial flash dryer systems — reach them at sales@fannonir.com.
How to Build Your DIY Flash Dryer (Step-by-Step)
Following this sequence — housing, then legs, then wiring, then bulbs — keeps every component accessible during construction and avoids the frustration of rewiring around hardware you've already mounted.
Step 1 — Build the Housing Box
Construct a five-sided, open-bottomed box from the five flat wood panels. Standard starting dimensions are 12"×12" per panel.
- Form the U-shape — screw or nail two side panels to the outer edges of a third side panel
- Add the fourth side — close the remaining open side
- Attach the top panel — the open face will point downward over the garment during use
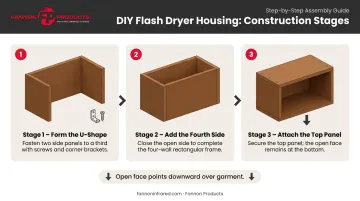
The box doesn't need to be furniture-quality, but joints should be solid. Gaps allow heat to escape and reduce efficiency.
Step 2 — Attach the Legs
Attach the four 2×4 leg pieces as vertical supports along two opposing sides of the box. Leg height should position the open face of the dryer 2–3 inches above the platen surface — ScreenPrinting.com confirms this as the standard working height for flash dryer positioning.
This gap allows heat to distribute across the garment without the box making direct contact with the substrate.
Step 3 — Wire the Electrical Components
Work carefully here — you're connecting live voltage to four sockets inside a wood enclosure. Double-check every connection before powering on.
- Drill the cord entry hole through the center of the top panel
- Run the power cord through the hole — leave enough slack inside to reach all four corners
- Mount the four ceramic sockets in the four interior corners of the box
- Wire each socket in parallel to the power cord — each bulb gets full supply voltage independently
- Mount the on/off switch on the exterior of the top panel
- Secure all interior wiring against the walls using appropriate staples or clamps — cords must not hang freely near the bulbs or contact the wood
Parallel wiring also means a single burned-out bulb won't kill the other three — the remaining bulbs keep running at full output.
Step 4 — Install the Infrared Bulbs
With wiring complete and connections secured, screw the 250W infrared bulbs into their sockets. Before finalizing the build:
- Confirm each bulb sits at least 2 inches from any wood surface
- Check that bulb spacing is as even as possible across the four corners
- Do not overtighten — infrared bulb envelopes are glass and crack under stress
Testing and Validating Your DIY Flash Dryer
A DIY unit has no factory settings. Skip validation and you risk two outcomes: garments that wash out because the ink never fully cured, or a housing that overheats from a wiring or clearance problem you didn't catch.
First Power-On Check
Run this before any garment goes near the dryer:
- Power on in an open space, clear of flammable materials
- Let it run for 5 minutes
- Inspect sockets, cords, and wood panels for discoloration, burning smell, or visible heat stress
- Any of these signs means a wiring or clearance problem — correct it before proceeding
Temperature Mapping with a Laser Gun
Place a piece of fabric at your intended working height. Use the laser temperature gun to take readings at multiple points across the heat zone.
What you're documenting:
- Hot center zone — typically directly under the bulbs
- Cooler edges — temperature drops off toward the perimeter
- The "sweet spot" — the area of most consistent heat; Riley Hopkins notes every flash dryer has one, and a DIY unit is no different
Target temperatures:
- Full plastisol cure: 320°F at the ink surface (standard inks); some low-cure formulations cure as low as 270°F per Union Ink data
- Flash/gel state for intercoat adhesion: 240–250°F
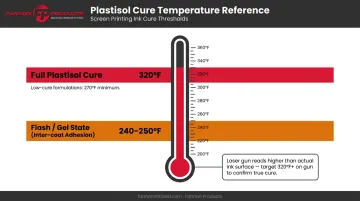
One important caveat: ScreenPrinting.com's testing found that a laser gun reading 325°F on a surface can correspond to an ink-layer temperature of only 215°F with a donut probe. Aim for a laser gun reading of 320°F+ to account for that gap.
Stretch Test and Wash Test
Before committing to a production run:
- Print a test garment and cure it using your documented height and dwell time
- Stretch the cooled print — cracking indicates under-cure
- Machine wash the garment at least three times; Wilflex recommends five wash cycles at 104–140°F depending on substrate
- Inspect after washing — ink lifting or fading means the cure was incomplete
Write down the height, dwell time, and temperature readings that produce a passing result. These become your operating settings.
Common DIY Flash Dryer Problems and Fixes
Most DIY flash dryer problems fall into three categories — and none require rebuilding from scratch.
Uneven Curing or Hot/Cold Spots
If prints cure in the center but edges wash out or stay tacky after the same dwell time, the bulbs are likely too far apart for the box size — creating a temperature drop-off toward the edges.
Fix:
- Add insulating panels to reduce the interior dimensions and concentrate heat
- Keep prints centered in the confirmed sweet spot during every run
- Never position a garment assuming the entire box zone is uniform — it isn't
Ink Not Reaching Full Cure Temperature
If your laser gun consistently reads below 300°F even with extended dwell time, the cause is usually insufficient bulb wattage for the box size and working height — or airflow bleeding off heat before it reaches the ink. Riley Hopkins specifically identifies fans, open doors, and open windows as cure-time disruptors.
Fix:
- Close windows and eliminate air movement around the dryer during use
- Lower the legs to reduce working height (increases surface temperature)
- If neither works, upgrade to higher-wattage bulbs — commercial flash units run 1,625W to 4,000W+
Overheating of the Wood Housing
Discolored panels, a burning smell, or scorch marks indicate insufficient clearance between bulbs and wood walls — or running the unit too long without cooling time between sessions.
Fix:
- Increase bulb-to-wood clearance
- Line the interior walls with aluminum flashing: it reflects infrared heat downward rather than allowing absorption into the wood
- Limit continuous run time; never leave the unit powered on and unattended
Pro Tips for Building and Using Your DIY Flash Dryer Effectively
Build for your actual print size from the start. A 12"×12" box handles pocket prints and left-chest logos. Full-back graphics need a wider box. Retrofitting is harder than planning ahead.
Document everything after calibration. Write down the exact height, dwell time, and temperature readings that produce a passing stretch and wash test. Post these at your workstation. Consistency in settings is what separates repeatable results from re-testing every session.
Recognize the ceiling. A well-built DIY flash dryer works for hobbyist volumes and single-color or two-color jobs. When order volume climbs, when multi-color flashing on tight timelines becomes routine, or when curing inconsistency persists despite correct calibration, a commercial infrared flash dryer is the practical next step — not a further DIY iteration.
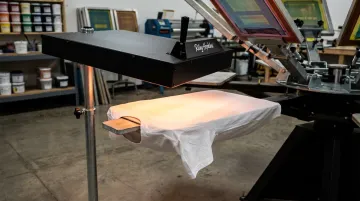
That's where Fannon Products comes in. Based in Algonac, Michigan, they manufacture replacement infrared lamps for commercial flash dryers — including M&R units — and build custom infrared process-heating systems with nearly 70 years in the industry. If you're evaluating the jump to commercial equipment, they can speak specifically to wattage requirements, element design, and what consistent output actually requires at production scale.
Conclusion
A DIY flash dryer built with correct components — ceramic sockets, properly rated infrared bulbs, safe clearances, and validated with a temperature gun — can serve a hobbyist or low-volume screen printer reliably. The build itself teaches you something real: how infrared heat interacts with ink layers, how working height and airflow shift cure consistency, and why even heat distribution isn't optional.
Those lessons matter when you eventually move up. Treat this build as a functional learning tool, not a permanent production solution. When print volume grows and consistency demands tighten, a purpose-built commercial flash dryer — with calibrated infrared lamps sized to your platen area and consistent watt density — will outperform any DIY unit on repeatability and throughput. At that point, sourcing industrial-grade replacement infrared lamps or a properly engineered flash system makes more sense than continuing to tune a homemade rig.
Frequently Asked Questions
What wattage infrared bulbs should I use for a DIY flash dryer?
Start with 250W infrared heat bulbs (R40 or BR40, E26 base, 120V) for a standard 12"×12" build — four bulbs totaling 1,000W. If the dryer consistently struggles to reach cure temperatures at a practical working height, moving to higher-wattage bulbs or reducing working height are the first corrections to try.
Can a DIY flash dryer fully cure plastisol ink, or only flash it?
A DIY flash dryer can fully cure plastisol if the ink surface reaches 320°F and holds that temperature for at least 3–5 seconds. Consistency varies more than with commercial units, so validate with a laser temperature gun, a stretch test, and a wash test every time you change ink, substrate, or working height.
How high should the flash dryer be positioned above the garment?
The standard working height is 2–3 inches above the platen or garment surface. Reducing height increases surface temperature but also raises scorching risk, so verify the actual ink-surface temperature with a laser gun rather than assuming a fixed height is always safe.
Is a DIY flash dryer safe to use indoors?
Indoor use is possible with good ventilation, no nearby flammable materials, and continuous supervision. The unit must never be left unattended while powered on. Keep a Class C (carbon dioxide) fire extinguisher accessible whenever the dryer is in use.
How do I know if my DIY flash dryer is actually curing the ink correctly?
Confirm with a laser temperature gun that the ink surface is reaching the manufacturer's specified cure temperature, typically 320°F for standard plastisol. Then run a stretch test on the cooled print — cracking indicates under-cure — followed by at least three machine wash cycles before trusting the result.
When should I upgrade from a DIY flash dryer to a commercial unit?
Upgrade when volume grows beyond occasional runs, when multi-color jobs demand fast, consistent flashing between layers, or when curing inconsistency persists despite correct calibration. Commercial flash units run 1,625W–4,000W with engineered heat distribution, which is a meaningful jump from a four-bulb DIY setup.