

The good news is that moisture levels are controllable. The right combination of equipment, proper sizing, and consistent maintenance can keep your system dry enough for virtually any application — from basic pneumatic tools to pharmaceutical-grade clean rooms.
This guide walks through exactly how to remove moisture from compressed air: which devices to use, what parameters govern results, and the mistakes that cause well-equipped systems to fail anyway.
Key Takeaways
- Compression concentrates water vapor until it condenses; high ambient humidity and temperature make the moisture load significantly worse
- Moisture removal happens in stages: draining liquid, aftercooling, and drying residual vapor
- Dryer selection hinges on your required dew point — refrigerated dryers reach 38–40°F, desiccant dryers reach -40°F to -100°F
- In printing and automotive finishing, moisture in the compressed air supply degrades process quality even when infrared drying handles the final cure
- Drain valve maintenance is the single most overlooked factor in real-world system performance
What Causes Moisture in Compressed Air?
All atmospheric air carries water vapor. The amount it holds increases with temperature — which creates the core problem: when air is compressed, its volume shrinks but its moisture content doesn't. That concentrates water vapor past its saturation point, and condensation forms as the air cools.
The scale of this can be surprising. According to Fluid Power Journal, a 200 cfm compressor operating at 90°F and 80% relative humidity produces 2.1 gallons of condensate per hour — enough to fill a 40-gallon drum in a single shift. Drop conditions to 70°F at 70% RH and that figure falls to 0.6 gallons per hour. At 35°F, just 0.2 gallons per hour. Summer conditions don't just create more moisture — they create exponentially more.

CAGI notes that moisture content in saturated air approximately doubles for every 20°F increase in temperature, which explains why systems that handle winter demand comfortably can be overwhelmed by July.
Temperature is the dominant driver, but three site conditions determine how severe that load gets:
- Coastal, riverside, and high-rainfall locations carry heavier humidity year-round, compounding the base moisture load
- Warmer intake air pulls more vapor into the compression cycle before the process even starts
- Hot compressed air entering cooler indoor piping triggers condensation at every transition point in the distribution system
Condensate doesn't stay at the compressor — it accumulates at aftercoolers, receiver tanks, drip legs, and end-use tools throughout the system. A single-point fix won't solve the problem.
How to Remove Moisture from Compressed Air: Step-by-Step
Step 1: Assess Your System and Determine the Required Dew Point
Before selecting any equipment, identify the dew point your application actually requires. This single decision drives every downstream choice.
ISO 8573-1 provides the standardized framework for specifying compressed air purity. The water classes range from Class 6 (pressure dew point below +50°F) for general plant air, down to Class 1 (below -94°F) for critical pharmaceutical and electronics processes.
A quick reference for matching application to dew point:
| Application | Recommended Dew Point | ISO Water Class |
|---|---|---|
| Pneumatic tools, general shop air | +37–45°F | Class 4–5 |
| General manufacturing, packaging | +35–40°F | Class 4 |
| Food processing (indirect contact) | +35°F or lower | Class 3–4 |
| Automotive finishing, precision painting | -4°F or lower | Class 3 |
| Electronics, direct-contact food | -40°F | Class 2 |
| Pharmaceutical, critical process air | -40°F to -94°F | Class 1–2 |
Before specifying equipment, inspect the current system for signs that moisture levels are already excessive: visible water at drain valves, corrosion on fittings or piping, rust-colored discharge, or erratic pneumatic tool performance.
Step 2: Drain Accumulated Liquid Water
Draining removes liquid that has already condensed inside tanks, aftercoolers, and piping low points. Three drain valve types serve different needs:
- Manual drains — require daily operation during high-use or humid periods; lowest cost but highest labor demand and most likely to be skipped
- Timer-based automatic drains — open on a set schedule regardless of condensate level; convenient but can waste compressed air or miss accumulation between cycles
- Zero-loss float drains — open only when liquid is detected, minimizing air loss; the best choice for most production environments
Install drains at the compressor discharge/aftercooler, at the bottom of receiver tanks, at dryer inlets and outlets, and at drip legs or low points throughout the distribution piping.
Step 3: Install an Aftercooler
The aftercooler is the first active moisture-reduction stage. It chills the hot compressed air coming off the pump, causing water vapor to condense immediately before it reaches the rest of the system. Atlas Copco reports that an integrated aftercooler can convert up to 70% of humidity into liquid water before draining — making it the single highest-impact stage for bulk moisture removal.
An air receiver tank placed after the aftercooler (a "wet tank") adds a second benefit: it allows additional radiant cooling and moisture settling while buffering the dryer from pressure pulsations. This reduces dryer inlet load and protects dryer performance under variable demand.
Step 4: Select and Install the Right Air Dryer
The aftercooler and drain system handle bulk liquid water. The dryer handles what they cannot: residual water vapor still suspended in the compressed air stream.
Two primary types handle most applications:
Refrigerated air dryers chill wet compressed air — the same principle used by an air conditioner — condensing vapor into liquid, draining it, then rewarming the dried air to prevent downstream condensation. CAGI lists achievable pressure dew points of 35–50°F under rated conditions. These suit most general industrial applications: pneumatic systems, packaging lines, automotive assembly, and standard manufacturing.
Desiccant (adsorption) dryers pass moist air over a hygroscopic material — silica gel, activated alumina, or molecular sieve — which chemically binds and removes water vapor. They achieve -40°F to -100°F pressure dew points, making them the required choice for food processing, pharmaceuticals, electronics, and any outdoor or sub-freezing installation. Heatless regenerative models can consume up to 18% of compressed air flow for desiccant regeneration, so correct sizing is not optional.
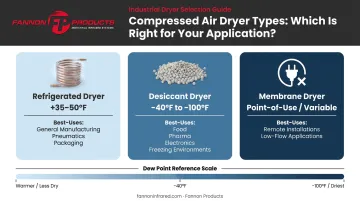
Membrane dryers serve as a point-of-use option for low-flow applications requiring no electrical power — useful for remote tools or specific zones within a larger system.
A quick comparison of dryer types by application:
| Dryer Type | Achievable Dew Point | Best For |
|---|---|---|
| Refrigerated | +35–50°F | General manufacturing, pneumatics, packaging |
| Desiccant | -40°F to -100°F | Food, pharma, electronics, outdoor/freezing environments |
| Membrane | Varies (point-of-use) | Remote or low-flow applications, no power available |
For industries like printing and automotive finishing, the dew point requirement doesn't stop at the compressor room. These applications use downstream drying equipment — infrared inkjet drying systems, UV LED curing systems, and paint-cure infrared heaters — to deliver final product quality. But if the compressed air feeding upstream pneumatics carries moisture, the result is coating defects, ink adhesion failures, and tool damage that no downstream drying stage can correct. Dry air at the source is the prerequisite.
Critical sizing note: Dryers are rated at specific inlet conditions (typically 100 psig, 100°F inlet temperature, 100°F ambient). If your actual conditions exceed these parameters, you must derate the dryer capacity accordingly using manufacturer correction factors — or the dryer will not achieve its rated dew point under real operating conditions.
Which Device Removes Moisture from Compressed Air?
No single device eliminates moisture on its own. Effective control requires layered equipment working in sequence.
Refrigerated Air Dryers
Refrigerated dryers are the most widely deployed option in industrial settings — and for good reason. Wet compressed air enters a heat exchanger, gets chilled to ~35–40°F, and condensed water drains automatically. The dried air is then reheated slightly to prevent pipe condensation downstream.
Key selection parameters:
- Inlet air temperature — elevated temps reduce rated capacity; always check manufacturer derating tables
- Maximum flow rate (CFM) — size for actual demand, not peak compressor output
- Ambient operating temperature — hot compressor rooms can significantly derate performance
- Duty cycle — cycling models save energy during variable-load operation; non-cycling models maintain stable performance under constant demand
Desiccant (Adsorption) Air Dryers
Where refrigerated dryers reach their limit — around 35°F — desiccant dryers take over. Moist air passes through a desiccant bed (silica gel for standard -40°F targets, molecular sieve for -70°F and below), which adsorbs water vapor directly from the air stream. One tower dries while the other regenerates.
Applications requiring desiccant dryers:
- Food and pharmaceutical processing
- Electronics manufacturing and PCB assembly
- Outdoor installations subject to freezing temperatures
- Any process requiring ISO Class 1–3 air quality
That said, desiccant dryers come with meaningful trade-offs: higher purchase cost, additional energy for regeneration, and significant purge air consumption in heatless models.
Water Separators and Inline Filters
These handle the mechanical stage of moisture control — removing bulk liquid water and aerosols. A centrifugal or cyclone separator uses rotational force to fling liquid droplets out of the air stream, while coalescing filters capture fine aerosols. Donaldson's cyclone separators achieve greater than 99% liquid droplet retention; Parker's H Series coalescing filters are rated at 99.995% efficiency for fine aerosol removal.
One boundary that matters: separators and filters do not remove water vapor and cannot reduce pressure dew point. CAGI and Parker both make this explicit. If your application requires vapor control or ISO PDP compliance, a dryer is non-negotiable — filters alone are not a substitute.
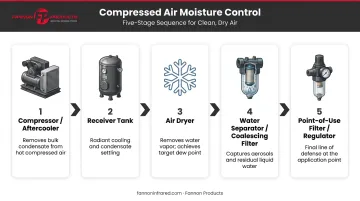
Filter/regulator combinations at the machine or tool inlet round out the system. They catch residual particulate and bulk moisture that slips past upstream equipment while also regulating downstream pressure — a practical last line of defense before air reaches the process.
Key Parameters That Affect Moisture Removal Results
Correctly specified equipment will still underperform when operating parameters fall outside the design range. Each variable below is a common culprit in systems that look right on paper but keep producing wet air.
Dew point target: Match the dryer's achievable dew point to actual application needs — this is the single most consequential design decision. Over-specify with a desiccant dryer where a refrigerated unit suffices and you waste energy. Under-specify and moisture damage continues. Use the ISO 8573-1 table above as your starting reference.
Flow rate and dryer capacity: Dryers are rated for specific inlet conditions. When actual airflow exceeds rated capacity — or inlet air runs hotter and more humid than rated — the dryer loses its specified dew point. This is one of the most common causes of moisture breakthrough in systems that appear properly sized.
Ambient temperature and seasonal variation: Summer heat increases moisture load far beyond what spring or fall numbers suggest. A 200 cfm compressor producing 0.6 gal/hr in spring can push 2.1 gal/hr in August. Size for worst-case summer conditions, not average plant conditions.
Drain valve function: A failed or clogged drain valve lets accumulated liquid back up into the air stream, undoing all upstream drying. It's the most overlooked variable in real-world systems. Test automatic drains every 3–6 months and confirm they're actually cycling.
Common Mistakes When Removing Moisture from Compressed Air
Avoid these four mistakes that undermine even well-designed compressed air systems:
- Skipping the aftercooler or receiver tank: Liquid water entering a refrigerated dryer reduces its cooling capacity and cuts efficiency. Mechanical separation must come first for the system to perform as rated.
- Undersizing the dryer: Sizing based on peak compressor output — without accounting for summer inlet temperatures or actual operating pressure — means the dryer won't hit rated dew point when conditions get tough. Use worst-case inlet conditions and apply manufacturer correction factors.
- Neglecting drain valve maintenance: A stuck-closed automatic drain is a leading cause of moisture problems in otherwise well-equipped systems. Water accumulates and migrates downstream, causing exactly the damage the dryer was meant to prevent.
- Ignoring early warning signs: Visible water at fittings, rust-colored discharge, erratic pneumatic tool performance, and frequent filter replacements all signal active moisture damage. Waiting to investigate consistently escalates repair costs.
Frequently Asked Questions
What causes moisture in compressed air?
Compressing ambient air concentrates water vapor beyond its saturation point, causing condensation — especially as the compressed air cools after leaving the pump. The amount of moisture produced is directly proportional to ambient humidity, intake temperature, and how much the air is compressed.
Which device removes moisture from compressed air?
No single device does the job alone. A complete system includes an aftercooler to remove bulk condensate, a refrigerated or desiccant dryer to remove water vapor, water separator filters at key points, and automatic drain valves to evacuate collected liquid.
How often should I drain my compressed air system?
In systems with manual drains, daily draining is recommended during high-use or high-humidity periods. Automatic drain valves simplify this but should still be tested and inspected every 3–6 months to confirm proper operation.
What is a dew point and why does it matter?
The dew point is the temperature at which water begins to condense out of air — the lower the dew point, the drier the air. To correctly specify moisture removal equipment, match your system's achievable dew point to your application's sensitivity. ISO 8573-1 provides the standard reference for that specification.
Can I use a refrigerated dryer and a desiccant dryer together?
Combining both is common in critical applications. The refrigerated dryer handles bulk moisture removal cost-effectively, removing 85–88% of vapor. The desiccant dryer then achieves ultra-low dew points for sensitive processes, operating at a reduced load that extends desiccant service life.
What are the signs of excessive moisture in a compressed air system?
Watch for these warning signs:
- Visible water pooling at fittings or drain valves
- Rust-colored or discolored air discharge
- Erratic or sluggish pneumatic tool performance
- Corrosion on internal components
- Unexpectedly frequent filter replacements
Any of these warrants immediate investigation of your moisture control system.