Flash dryers are the standard tool for this job, but they're not always available. Hobbyists, new shops, and small-scale operations often need workable alternatives that still hit professional standards. The good news: there are four reliable methods that work, each suited to different budgets and production volumes.
This article explains what full cure actually means for plastisol ink, walks through all four methods with specific settings and steps, covers the variables that affect your results, and shows you how to confirm cure before committing to a full production run.
Key Takeaways
- Full cure requires the entire ink layer — not just the surface — to reach the manufacturer's specified temperature
- Standard plastisol cures at 320°F; low-cure formulations can cure at 250°F–270°F depending on the brand
- Four proven methods without a flash dryer: heat gun, heat press, conveyor dryer, and IR lamp
- Always verify cure with a stretch test and 3 wash cycles before running a full order
- Use a donut probe to read the ink-to-garment interface temperature; a laser temp gun only reads the surface
What "Full Cure" Actually Means for Plastisol Ink
Understanding what "cured" actually means is where most plastisol failures start — and end.
Full cure means the ink has reached the correct temperature all the way through — from the top surface down to the layer bonded to the fabric fibers. Lawson Screen & Digital Products documents standard plastisol requiring 320°F throughout the entire ink film, not just at the surface.
Surface Gel vs. Full Cure
Plastisol passes through a gel state before it fully cures. At roughly 180°F–250°F, the ink becomes tack-free and feels solid. It isn't fused yet. The surface holds its shape, but the lower layers of the ink deposit remain uncured and will fail in the wash.
Full cure requires reaching 300°F–330°F all the way through the deposit — not just at the surface. The distinction matters because the gel stage is what misleads most printers into pulling shirts too early.
Temperature Ranges by Ink Type
| Ink Type | Cure Temperature Range |
|---|---|
| Standard plastisol | 320°F |
| Low-cure plastisol (e.g., Union Ink) | 270°F–320°F |
| Low-cure (e.g., Wilflex) | As low as 250°F |
| FN-INK (ScreenPrinting.com) | 260°F through entire layer |
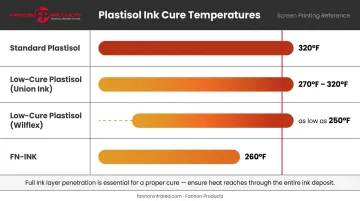
Always check the ink manufacturer's data sheet before setting your process. Cure thresholds vary between formulations, and running a low-cure ink at standard temperatures (or vice versa) will produce inconsistent results.
4 Methods to Cure Plastisol Ink Without a Flash Dryer
Method 1: Heat Gun
A heat gun is the most accessible entry point — inexpensive, widely available, and capable of curing small prints when used correctly.
Best for: Single garments, small chest prints, hobbyist use, and spot repairs.
How to do it:
- Hold the heat gun steadily above the print at a consistent height (exact distance varies by model, so check your heat gun's specs)
- Move in a slow, overlapping circular or side-to-side pattern to distribute heat evenly
- Use a laser temperature gun to confirm the ink surface reaches cure temperature before moving on
- Keep the motion steady — pausing in one spot risks scorching; moving too fast leaves cold spots
The core limitation: Heat guns deliver uneven heat across larger prints. Riley Hopkins flags it directly: heat guns work for small print areas but are difficult to use consistently across an entire design. For anything larger than a small chest logo, a different method is more reliable.
Method 2: Heat Press
A heat press delivers consistent, controlled heat across the full print surface, making it one of the most reliable alternatives for shops without a conveyor dryer.
Best for: Small-to-mid-scale operations, multi-use shops (vinyl, transfers, and screen printing), consistent single-garment curing.
How to do it:
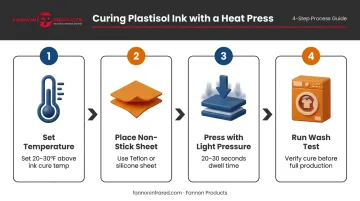
- Set the temperature 20–30°F above the ink's rated cure temperature; pressing at the rated temperature alone often undercures
- Place a heat-resistant non-stick sheet (Teflon or silicone) between the platen and the print to prevent ink from sticking to the platen or getting disturbed
- Press with light to medium pressure for 20–30 seconds
- Run a wash test before committing to production — don't assume one press cycle is enough without verification
Both Riley Hopkins and ScreenPrinting.com document the same setup: 20–30°F above cure temperature, light-to-medium pressure, non-stick sheet, 20–30 second dwell.
The downside is throughput. Every shirt requires manual loading and unloading, which limits how fast you can work. For short runs under 24 pieces, it's practical. Beyond that, the time cost adds up fast enough that a conveyor setup becomes worth the investment.
Method 3: Conveyor Dryer
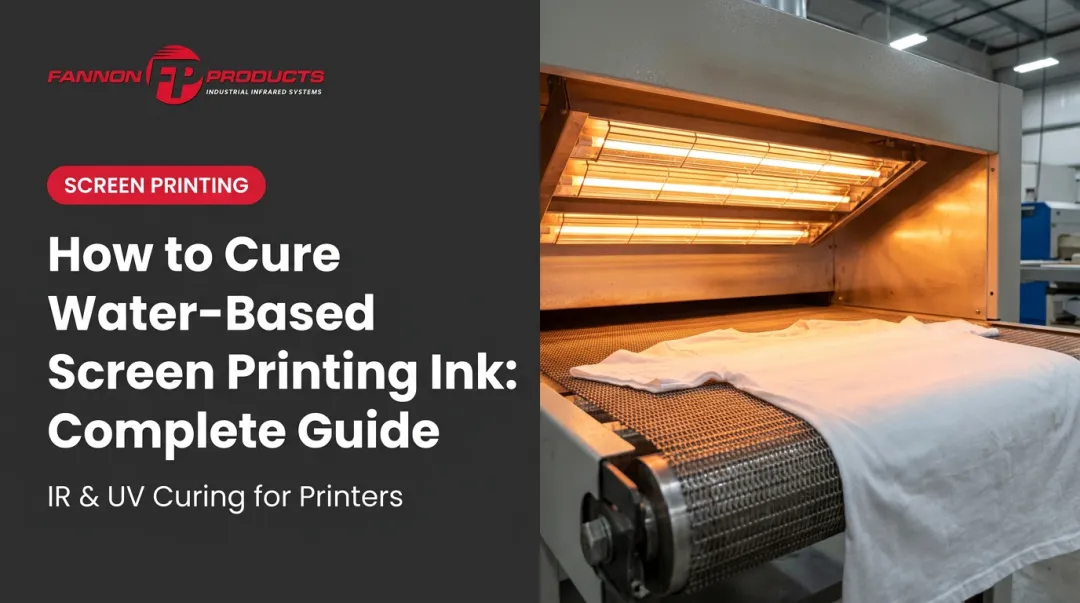
A conveyor dryer is the standard tool for medium-to-high volume shops. Garments move through on a belt under consistent radiant heat, eliminating manual handling and shirt-to-shirt variation.
Best for: Medium-to-high volume shops, consistent production runs, operations that have outgrown the heat press.
Setup process:
- Set the dryer temperature and belt speed based on the ink's cure temperature and your tunnel length
- Shorter tunnels require slower belt speeds to give garments enough dwell time
- Use a donut probe (not just the dryer's temperature display) to confirm actual ink temperature through the tunnel. Anatol flags the dryer display as an unreliable proxy for actual ink temperature
- Run test garments and confirm cure with a wash test before production
On cost: Entry-level tabletop conveyor dryers (like the Vastex D-100) start around $2,800. More capable units for medium-volume shops run from $3,000 to $7,000+. These are distributor price examples; actual pricing varies by supplier and configuration. It's a real capital investment, but one that pays off once manual curing becomes the production bottleneck.
Method 4: Infrared (IR) Lamp
Dedicated infrared lamps sit between a heat gun and a full conveyor dryer: more controlled than handheld tools, and more compact and affordable than a tunnel system.
Best for: Growing shops that need faster, more consistent curing than a heat gun but aren't ready for a full conveyor system.
IR lamps work by directing radiant infrared heat at the printed garment from a fixed position above. The key principle remains the same as any other method: the entire ink layer must reach cure temperature. Confirm this with a laser temp gun or donut probe, not by appearance alone.
Fannon Products manufactures medium-wave infrared lamps designed for screen printing operations, including direct replacement lamps for M&R flash dryer systems. Medium-wave infrared is less color-sensitive than short-wave emitters, which matters in multicolor work where ink colors vary.
Key specs for Fannon's screen printing lamps:
- Fast-response "star" coil reaches operating temperature in under one second — practical for rapid cycling between color passes
- Wattage options from 1,000W to 2,000W
- Available in 208V, 240V, and 480V configurations
For shops running existing M&R equipment, Fannon's lamps are direct drop-in substitutes, available from their Michigan facility with typical lead times of 1–2 business days.
Key Variables That Affect Your Cure Results
The method you choose matters less than controlling the variables that affect heat penetration. Control these four, and most cure problems disappear.
Ink Deposit Thickness
Thicker ink layers take longer and require more sustained heat to cure all the way through. A heavy white underbase behaves very differently from a thin single-color pass.
- Sign of undercure on thick deposits: the print cracks uniformly when stretched
- Fix: increase dwell time, reduce distance from heat source slightly, or run the garment through a second pass
Garment Fabric and Color
Fabric content affects how quickly — and how much — heat transfers to the ink layer.
- Cotton absorbs and retains moisture, which slows cure times
- Polyester and blends heat up faster, but risk dye migration when temperatures exceed 265°F — documented by Avient's dye migration guide
- Dark fabrics absorb more radiant heat than light ones, which can affect surface temperature readings from a laser gun
For polyester garments, low-cure plastisol formulations help reduce the temperature needed and keep dye migration risk lower.
Heat Source Distance and Coverage
For heat guns and IR lamps, distance from the heat source to the print directly controls heat intensity. The stakes on either end are clear:
- Too far: insufficient heat penetration leads to undercure
- Too close: risks scorching the substrate or garment
- Conveyor dryers and heat presses: distance is fixed by design, removing this variable entirely
With handheld tools, maintaining consistent distance takes consistent technique throughout the process.
Shop Temperature
A cold shop means garments start at a lower baseline, extending the time needed to bring ink up to cure temperature. In colder environments, pre-warming platens and garments before curing reduces that gap and produces more consistent results.
Common Mistakes to Avoid
Trusting appearance over temperature — Plastisol can gel on the surface, becoming tack-free and solid-feeling, without achieving a full cure. The only reliable confirmation is verified temperature through the ink layer, plus a wash test.
Using the equipment setting as a proxy for ink temperature — The number on a heat press display or heat gun does not equal what the ink actually reaches. Always verify with a laser temp gun or donut probe.
Skipping the wash test before production — Run at least 3 wash-dry cycles on a test garment before committing to a full order. ScreenPrinting.com recommends a minimum of 3 cycles; Lawson suggests 5–10 for full confirmation.
Ignoring ink manufacturer specifications — Standard plastisol and low-cure plastisol have different cure thresholds. Curing standard ink at low-cure temperatures leaves it undercured; pushing low-cure ink to standard temperatures risks dye migration and garment damage.
How to Test If Your Plastisol Ink Is Fully Cured
Stretch Test
Immediately after curing, grip the printed area on both sides and stretch it firmly across the widest part of the design. If the ink cracks uniformly and doesn't recover, it was undercured. If it stretches and snaps back without cracking, the surface has at least gelled properly.
Keep in mind: the stretch test only confirms the surface layer, not a full cure. Some athletic and spandex-based plastisols stretch without cracking even when undercured, so treat this as a quick check rather than a definitive pass.
Wash Test
Wash and dry the test garment for at least 3 full cycles using normal settings. If the ink remains intact with no cracking, flaking, or color loss, the cure is successful. Any degradation means the garment was undercured and the process needs adjustment before running production.
Temperature Verification Tools
Use one of these during every curing session:
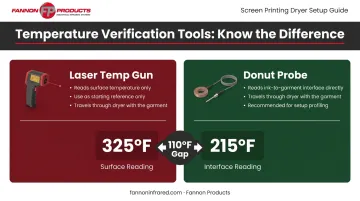
- Laser temp gun: Reads surface temperature only. ScreenPrinting.com's comparison found a laser reading of 325°F while the actual ink-to-garment interface sat at 215°F. That 110° gap is large enough to cause systematic undercuring. Use a laser gun as a starting reference, not your primary verification method.
- Donut probe (contact thermometer): Travels through the dryer or sits under the heat source with the garment and reads the ink-to-garment interface temperature directly. More accurate and the better choice for profiling your curing setup.
Frequently Asked Questions
What temperature does plastisol ink need to cure?
Standard plastisol inks cure at 320°F through the entire ink layer. Low-cure formulations vary by brand — Wilflex low-cure products can cure as low as 250°F, while Union Ink's low-cure range is 270°F–320°F. Always check the specific ink manufacturer's data sheet before setting up any curing method.
Can you overcure plastisol ink?
Yes. Excessive heat can cause dye migration in polyester and poly/cotton garments above 265°F, and can damage the substrate. That said, undercuring is far more common in practice — most curing failures come from not enough heat, not too much.
What is the difference between flashing and curing plastisol ink?
Flashing is a brief, partial heat application that gels the ink surface between colors so the next layer can be applied without smearing — it does not fully cure the ink. Full curing happens at the end of the printing process and requires the entire ink deposit to reach the manufacturer's recommended cure temperature throughout.
How do I know if my plastisol ink is fully cured without a flash dryer?
Use a donut probe or laser temp gun to confirm the ink reached cure temperature, then run a stretch test and complete at least 3 wash-dry cycles. Temperature tools and stretch tests are useful indicators, but wash testing is the only definitive confirmation — non-negotiable before production runs.
Can I use a regular household iron to cure plastisol ink?
Not recommended. Household irons are difficult to maintain at consistent temperatures, don't cover prints evenly, and direct contact can smear or disturb uncured ink. A heat press with a non-stick sheet is significantly more controlled and reliable.
How long does it take to cure plastisol ink?
With a heat press, typically 20–30 seconds at 20–30°F above the ink's cure temperature. Conveyor dryer dwell time depends on belt speed, tunnel length, and ink deposit thickness. With any method, what matters is that the entire ink layer reaches the manufacturer's cure temperature — not hitting a specific time.