Most curing failures — washing off, cracking, fading — trace back not to the ink itself but to incomplete or incorrect curing. This guide covers the full two-phase process, the equipment options available, the variables that determine success, and the mistakes that cost shops reprints and customer returns.
Key Takeaways
- Water-based ink requires complete water evaporation before polymer cross-linking starts; skipping evaporation means the ink will never fully cure
- Target cure temperature is 300–320°F (150–160°C); always verify at the ink surface, not the machine dial
- Airflow is as critical as heat; without it, trapped steam blocks full evaporation and undermines the cure
- A stretch test alone is not enough; a wash test of at least 3 cycles is the only reliable cure confirmation
- Low-cure additives help when equipment lacks adequate airflow, but don't eliminate the need for proper evaporation
How to Cure Water-Based Screen Printing Ink
Understanding the Two-Phase Chemistry
Plastisol is a 100% solids system — heat it to the right temperature and the PVC particles fuse. Done. Water-based ink doesn't work that way.
According to Permaset, water-based textile inks require water removal before polymer particles can cross-link and bond chemically to fabric fibers. The ink film cannot reach full cure temperature until all water has evaporated.
Water physically cannot exceed 212°F (100°C) at atmospheric pressure. As long as moisture is present, the ink surface is capped at boiling point regardless of how hot your equipment runs.
This is why a quick high-heat blast produces prints that feel dry but wash off completely. The ink looked cured. It wasn't.
Step 1: Prepare the Print and Environment
Before entering the cure stage:
- Allow a brief flash or air-dry period after printing — this removes surface moisture and reduces the evaporation load in the dryer
- Check ambient humidity; high-humidity environments extend Phase 1 significantly
- Confirm your equipment's temperature setting matches the ink manufacturer's specification (typically 300–320°F)
- Use a laser IR temperature gun to verify actual ink surface temperature, since dial readings are often inaccurate
Step 2: Evaporate the Water (Phase 1)
Apply consistent heat with adequate airflow over the print. This is where many setups fail.
Anatol documents that when water-based inks are heated, water escapes as steam. If air cannot circulate around the print, that steam becomes trapped and prevents the remaining water from evaporating. The result is a print that appears dry but hasn't fully completed Phase 1.
For flash dryers or IR lamp systems:
- Hold the heat source at the correct distance (typically 2–4 inches)
- Monitor the ink surface — look for a matte, fully dry appearance before proceeding
- If your equipment lacks forced air, this phase takes longer; factor in extra dwell time
Step 3: Achieve Full Cure Temperature (Phase 2)
With Phase 1 complete, the polymer can now cross-link properly. Maintain the ink at cure temperature for the required dwell time. Ryonet/ScreenPrinting.com recommends holding cure temperature for at least 20 seconds after full evaporation; Anatol's general benchmark is 300–320°F for 2–3 minutes total process time.
Key points:
- Thicker ink deposits and heavier fabrics require longer dwell times
- Reaching cure temperature for a second or two is not the same as holding it
- Always follow your specific ink manufacturer's time-temperature guidelines — these vary by formulation
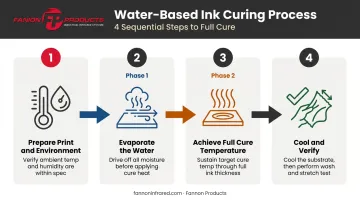
Step 4: Cool and Verify
- Allow garments to cool completely before stacking — hot prints transfer ink to adjacent garments
- Perform a stretch test immediately: gently stretch the printed area; cracking indicates under-cure
- Plan a wash test before approving any production run (more on this below)
What You Need Before Curing Water-Based Ink
Water-based inks have specific curing demands that plastisol inks don't — moisture must fully evaporate before the ink polymer sets. Having the right equipment and materials confirmed before you run a single shirt prevents failed cures and wasted production time.
Equipment and Tool Requirements
Minimum requirements for any setup:
- Heat source capable of reaching and sustaining 300–320°F
- Some form of airflow — forced air is strongly preferred
- Laser IR temperature gun for actual ink surface verification
- Heat-resistant non-stick barrier sheet (if using a heat press)
With equipment verified, the next step is confirming your ink and substrate are ready for the heat cycle.
Materials and Ink Readiness
Before curing, confirm:
- The ink is a textile-grade water-based fabric ink — paper inks have different cure requirements
- Low-cure additive use — check your ink manufacturer's guidance for your specific equipment type
- Mesh count is appropriate — Anatol recommends around 156 mesh as a starting point for water-based inks; finer mesh deposits thinner layers that cure faster and more uniformly
- A thicker ink deposit means more water to evaporate and longer cure times
Operator and Safety Readiness
Water-based ink curing produces steam and fumes during the evaporation phase. In commercial shops, make sure:
- Adequate exhaust ventilation in the curing area
- Follow local workspace air quality regulations
- All operators know that visible steam doesn't mean evaporation is complete
Key Parameters That Affect Water-Based Ink Curing Results
Most curing failures trace directly to one or more of these variables being out of specification.
Temperature Accuracy
The gap between your machine's dial and the actual ink surface temperature can be significant. ScreenPrinting.com notes that IR gun readings can run 120–150°F hotter than donut probe readings early in a dryer cycle, and surface temperatures sometimes need to be set 60–100°F above the stated cure temperature depending on tunnel length.
- Under-temperature: Incomplete cross-linking — print washes off
- Over-temperature: Fabric damage, scorching, ink discoloration
- Always measure at the ink surface, not the air temperature inside the chamber
Air Circulation and Ventilation
For water-based inks, airflow is as critical as temperature. Without circulation, water vapor sits on the ink surface and blocks evaporation entirely — the leading cause of under-cure even when temperatures are dialed in correctly.
Conveyor dryers with forced air address this directly by actively moving moisture out of the cure zone. Flash dryers without forced air require low-cure additives and careful technique to compensate.
Ink Deposit Thickness and Mesh Count
A heavy ink deposit holds more water and demands significantly longer cure times. Coarse mesh screens deposit thick layers, making them the most common source of under-cure in water-based printing.
- Finer mesh = thinner deposit = faster, more uniform cure
- If switching from plastisol to water-based, consider moving to a finer mesh count
Dwell Time Consistency
Inconsistent dwell time is a production-scale problem. Some garments in a run cure properly; others don't. This makes quality control unreliable and means you can't trust a single test print to represent the full run.
Flash dryers and heat guns are particularly prone to this inconsistency. Conveyor dryers enforce dwell automatically through belt speed.
Common Mistakes When Curing Water-Based Screen Printing Ink
Most cure failures trace back to the same four mistakes. Knowing what they are makes them easy to avoid.
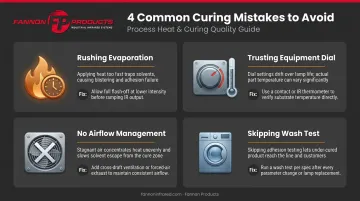
Rushing the evaporation phase. Printers apply high heat briefly, see the print look dry, and move on. If water hasn't fully evaporated, polymer cross-linking can't complete. The print passes a visual check — even a quick stretch test — then fails the first wash.
Trusting the equipment dial instead of measuring ink temperature. The set temperature on a flash dryer or heat press is not the ink surface temperature. Without a laser IR thermometer, you're guessing — and the result is inconsistent cure quality across a run, with no way to identify failures until returns come back.
Using equipment without adequate airflow. Flash dryers and heat guns without forced air circulation are a poor fit for water-based inks unless low-cure additives are in the mix. Steam trapped against the ink surface looks dry while actually blocking the evaporation Phase 1 requires.
Skipping the wash test. A stretch test only confirms whether the top layer of ink is cured — ScreenPrinting.com notes it won't reveal incomplete cure through the bottom layer. The only real confirmation is a wash test. ScreenPrinting.com recommends at least three wash-dry cycles before approving a production run. Skipping this step is how one bad setup turns into hundreds of returns.
Curing Equipment Options for Water-Based Screen Printing Ink
No single method fits every shop. Budget, volume, and available space all factor into the decision — and each method has real limitations with water-based inks.
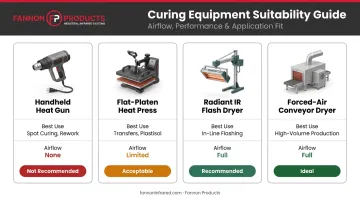
Heat Gun
- Best for: Hobbyist or startup use; very low volume, highly portable
- Trade-offs: No forced airflow, inconsistent heat distribution, requires constant manual movement and monitoring; not reliable for water-based inks without a low-cure additive; not recommended for any production volume
Heat Press
- Best for: Low-to-medium volume shops with small or custom print runs
- Trade-offs: Must hover first to allow steam to escape before pressing; one piece at a time limits throughput; requires a heat-resistant non-stick barrier sheet; generally reliable with proper technique
The hover-then-press approach is the key with heat presses — pressing directly onto a wet print traps steam and prevents Phase 1 from completing.
Infrared Flash Dryer
- Best for: Small-to-medium shops needing faster throughput than a heat press; compact footprint
- Trade-offs: Does not inherently provide forced air circulation — the critical requirement for Phase 1; low-cure additives are strongly recommended when airflow is limited; dwell time consistency requires careful attention
IR lamp quality directly affects heat consistency and efficiency in flash dryer applications. Fannon Products manufactures medium-wave IR lamps specifically engineered for M&R flash dryers, one of the most widely deployed flash dryer platforms in screen printing. Their lamps feature a fast-response star coil that reaches operating temperature in under one second, and medium-wave technology that is less color-sensitive to light and dark inks compared to short-wave emitters.
That color-sensitivity difference matters in multicolor jobs where consistent curing across varied ink colors is essential. Replacement models are available from 1,000W to 2,000W across 208V, 240V, and 480V configurations, with lamps typically in stock for 1–2 day shipping from their Michigan facility.
Conveyor Dryer (Forced Air)
- Best for: High-volume production; the only method that fully addresses both curing phases in a single automated pass
- Trade-offs: Highest equipment cost and space requirement
Ryonet/ScreenPrinting.com identifies a minimum six-foot forced-air conveyor dryer as the industry standard for water-based inks, with full cure achieved in 1:30 to 2:00 minutes. This setup enforces consistent dwell time across every garment and provides the airflow that makes Phase 1 reliable. For any shop running water-based ink at production volume, a forced-air conveyor is the right tool.
Frequently Asked Questions
How long does water-based screen printing ink take to dry?
Drying (water evaporation) and curing are two separate phases. Both must complete for a durable print. With a forced-air conveyor dryer at 300–320°F, the full process typically takes 1:30 to 3 minutes depending on ink deposit thickness, ambient humidity, and equipment. Thicker deposits and high humidity extend the timeline.
How do you make water-based ink permanent?
Permanence requires full cure — not just surface drying. That means reaching the manufacturer's specified cure temperature (typically 300–320°F) and holding it long enough for polymer cross-linking to complete. Confirm with at least three wash-dry cycles before treating any prints as finished product.
What temperature does water-based screen printing ink cure at?
The general industry range is 300–320°F (150–160°C), but dwell time matters just as much. Plan for at least 20 seconds at temperature after full water evaporation, with total process times of 1.5–3 minutes. Always verify against your specific ink manufacturer's technical data sheet.
Can you cure water-based screen printing ink with a heat gun?
A heat gun can work for very small-scale use, but it lacks the forced air circulation and consistent temperature control that water-based ink requires. Without a low-cure additive, results are unreliable. Not recommended for production.
Do you need a special additive to cure water-based screen printing ink?
Low-cure crosslinkers aren't required with a forced-air conveyor dryer and proper dwell time. They become strongly recommended for flash dryers or heat guns that lack airflow, since they chemically assist cross-linking where equipment falls short. Some crosslinkers (such as Green Galaxy Warp Drive at 1.5% by weight) can lower cure temperature to 180°F, though full cure still requires 48 hours post-print.